Installing and Running MTASA Server on GNU Linux
Installation 64 bit
Main binary
Download the latest stable 64 bit Linux binaries:
rm -f multitheftauto_linux_x64.tar.gz
wget http://linux.mtasa.com/dl/multitheftauto_linux_x64.tar.gz
Unpack into a directory:
tar -xf multitheftauto_linux_x64.tar.gz
Default config
Download the default config files:
rm -f baseconfig.tar.gz
wget http://linux.mtasa.com/dl/baseconfig.tar.gz
Unpack and move into the deathmatch directory:
(Note: Only do this for new installations as it will overwrite any existing config files.)
tar -xf baseconfig.tar.gz
mv baseconfig/* multitheftauto_linux_x64/mods/deathmatch
Change to the MTA server install directory:
cd multitheftauto_linux_x64
Test
You can now test if the server will start correctly:
./mta-server64
Default resources
If you need the default resources:
Download the latest default resources zip from http://mirror.mtasa.com/mtasa/resources/
and unzip into mods/deathmatch/resources
Make sure you are in the MTA server install directory when following this example:
apt-get install unzip
mkdir mods/deathmatch/resources
cd mods/deathmatch/resources
rm -f mtasa-resources-latest.zip
wget http://mirror.mtasa.com/mtasa/resources/mtasa-resources-latest.zip
unzip mtasa-resources-latest.zip
rm -f mtasa-resources-latest.zip
cd ../../..
Installation 32 bit
Main binary
Download the latest stable 32 bit Linux binaries:
rm -f multitheftauto_linux.tar.gz
wget http://linux.mtasa.com/dl/multitheftauto_linux.tar.gz
Unpack into a directory:
tar -xf multitheftauto_linux.tar.gz
Default config
Download the default config files:
rm -f baseconfig.tar.gz
wget http://linux.mtasa.com/dl/baseconfig.tar.gz
Unpack and move into the deathmatch directory:
(Note: Only do this for new installations as it will overwrite any existing config files.)
tar -xf baseconfig.tar.gz
mv baseconfig/* multitheftauto_linux/mods/deathmatch
Change to the MTA server install directory:
cd multitheftauto_linux
Test
You can now test if the server will start correctly:
./mta-server
Default resources
If you need the default resources:
Download the latest default resources zip from http://mirror.mtasa.com/mtasa/resources/
and unzip into mods/deathmatch/resources
Make sure you are in the MTA server install directory when following this example:
apt-get install unzip
mkdir mods/deathmatch/resources
cd mods/deathmatch/resources
rm -f mtasa-resources-latest.zip
wget http://mirror.mtasa.com/mtasa/resources/mtasa-resources-latest.zip
unzip mtasa-resources-latest.zip
rm -f mtasa-resources-latest.zip
cd ../../..
Running with 32 or 64 bit Linux
Make sure your server libraries and stuff are up to date
On Debian/Ubuntu this is done with:
apt-get update
apt-get upgrade
Troubleshooting
- If you get a problem with such as "libreadline.so.5: cannot open shared object file: No such file or directory.", it can be solved on 32 bit Debian/Ubuntu by doing this:
apt-get install libreadline5
- If you get a problem with such as "libncursesw.so.5 cannot open shared object file: No such file or directory", it can be solved on 32 bit Debian/Ubuntu by doing this:
apt-get install libncursesw5
Note: If you experience this issue on a 64-bit machine while trying to run the 32-bit MTA server, then you should install the following package on a 64-bit Debian/Ubuntu machine (as root):
apt-get install lib32ncursesw5
You can find more 32-bit library alternatives on this page: www.debian.org/distrib/packages#search_contents.
MySQL Troubleshooting
- If you are using the inbuilt MySQL functions such as dbConnect and dbQuery, you will need to have libmysqlclient.so.16 installed.
- If you get a problem with such as "libmysqlclient.so.16: cannot open shared object file: No such file or directory", it can be solved on Debian/Ubuntu by doing this:
apt-get install libmysqlclient16
If that fails:
- For 32 bit Linux, download 32 bit libmysqlclient.so.16 and put it in /usr/lib/
- For 64 bit Linux, download 64 bit libmysqlclient.so.16 and put it in /usr/lib/
[Optional] Installing and Configuring an External Web Server
Instructions on how to install and configure Nginx as an external web server for MTA is here: Installing and Configuring Nginx as an External Web Server
Server crashes
If your Linux server crashes, please obtain a backtrace and post a report on our Bug tracker
To obtain a backtrace:
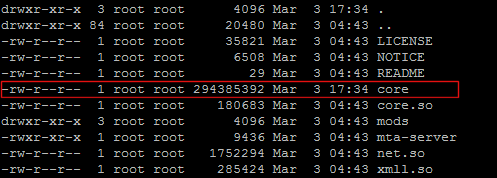
Do you have a core dump file in the the MTA server directory?
It's usually called 'core', and usually over 100MB, and looks something like this:

If you have a core dump file in the the MTA server directory:
- Install gdb. To install gdb on Debian, use this command:
apt-get install gdb
- And from the MTA install directory do this command
gdb mta-server -c core
- When gdb launches, do this command to get a module list:
i sh
- And then this command to get a backtrace:
bt
- Save the output
- (To exit gdb, use the quit command)
If you do not have a core dump file in the the MTA server directory:
- Install gdb. To install gdb on Debian, use this command:
apt-get install gdb
- And from the MTA server directory start the mta-server like this:
gdb -ex "set print thread-events off" --eval-command run --args mta-server -q
- Now wait for a crash. (Ignore any weird screen output in the meantime)
- When a crash occurs, do this command to get a module list:
i sh
- And then this command to get a backtrace:
bt
- Save the output
- (To exit gdb, use the quit command)
Server freezes
If your Linux server freezes, please obtain a backtrace with thread information and post a report on our Bug tracker
To obtain a backtrace with thread information:
- Install gdb. To install gdb on Debian, use this command:
apt-get install gdb
- And from the MTA server directory start the mta-server like this:
gdb -ex "set print thread-events off" --eval-command run --args mta-server -q
- Now wait for a freeze. (Ignore any weird screen output in the meantime)
- When a freeze occurs, press ctrl-c to start gdb
- Then do this command to get a module list:
i sh
- And then this command to get a backtrace:
bt
- And then this command to get thread information:
info threads
- Save the output
- (To exit gdb, use the quit command)
Automatic installer
Prerequisites
Make sure you have bash, unzip, tar and wget available on your server. Also notice that for 64-bit servers the 64-bit binary will be installed, otherwise 32-bit binary will be.
Source code
 #!/bin/bash -x
 #==============================================================================#
 #                                mtasa-install                                 #
 #------------------------------------------------------------------------------#
 #  This shellscript installs MTA:SA on your server. You can configure it and   #
 #  modify it as desired, you can even improve it if you want.                  #
 #==============================================================================#

 ARCH_TYPE=""

 getArchitecture()
 {
     if ((1<<32)); then
         ARCH_TYPE="_x64"
     fi
 }

 downloadFiles()
 {
     wget http://linux.mtasa.com/dl/multitheftauto_linux${ARCH_TYPE}.tar.gz
     wget http://linux.mtasa.com/dl/baseconfig.tar.gz
 }

 unpack()
 {
     tar -xf multitheftauto_linux${ARCH_TYPE}.tar.gz
     tar -xf baseconfig.tar.gz
 }

 moveConfig()
 {
     mv baseconfig/* multitheftauto_linux${ARCH_TYPE}/mods/deathmatch
     rm -rf baseconfig
     cd multitheftauto_linux${ARCH_TYPE}
 }

 installResources()
 {
     mkdir mods/deathmatch/resources
     cd mods/deathmatch/resources
     wget http://mirror.mtasa.com/mtasa/resources/mtasa-resources-latest.zip
     unzip mtasa-resources-latest.zip
     cd ../../..
 }

 clean()
 {
     rm -f ../multitheftauto_linux${ARCH_TYPE}.tar.gz
     rm -f ../baseconfig.tar.gz
     rm -f mods/deathmatch/resources/mtasa-resources-latest.zip
 }

 main()
 {
     getArchitecture
     clean
     downloadFiles
     unpack
     moveConfig
     installResources
     clean

     if ((1<<32)); then # 64 bits
         echo "Installation ready! Use ./mta-server64 to initialize server"
     else
         echo "Installation ready! Use ./mta-server to initialize server"
     fi
 }

 main # calling program entry point
Procedure
To proceed with installation, save somewhere with read-write-execute access (777) the mtasa-install shell. Finally, proceed to execute it (./mtasa-install for example).