DE/Resource:Editor: Difference between revisions
No edit summary |
No edit summary |
||
| Line 76: | Line 76: | ||
Der ''"Current elements"'' Dialog kann auch verwendet werden um Elemente auszuwählen. Doppelklick auf ein Element wählt es im ''Tastaturmodus'' aus. | Der ''"Current elements"'' Dialog kann auch verwendet werden um Elemente auszuwählen. Doppelklick auf ein Element wählt es im ''Tastaturmodus'' aus. | ||
===Elemente | ===Elemente verschieben=== | ||
Elemente können über verschiedene Wege verschoben werden. | Elemente können über verschiedene Wege verschoben werden. | ||
| Line 84: | Line 84: | ||
* Wähle das Element im Mausmodus mit ('''Rechtsklick'''), bewege es dort hin, wo du es haben willst, und Klicke um es zu platzieren. | * Wähle das Element im Mausmodus mit ('''Rechtsklick'''), bewege es dort hin, wo du es haben willst, und Klicke um es zu platzieren. | ||
Du kannst auch die ''Distanz'' von einem Element zur Kamera ändern durch wählen des '''Kameramodus''', '''Rechtsklick''' auf das Element, und rollen des '''Mausrad'''. | |||
''' | '''Mit der Tastatur''' | ||
* | * Wähle das Element im Tastaturmodus ('''Linksklick'''). | ||
* | * Benutze die '''Pfeiltasten''' um das Element horizontal zu bewegen, und '''PgUp'''/'''PgDn''' um es vertikal zu bewegen. Halte '''ALT''' um die Bewegungsgeschwindigkeit zu verringern, oder '''SHIFT''' um die Bewegungsgeschwindigkeit zu erhöhen. | ||
By default, elements move relative to the camera and are not locked to any axes. This can be disabled in the ''Options'' menu. | By default, elements move relative to the camera and are not locked to any axes. This can be disabled in the ''Options'' menu. | ||
Revision as of 14:55, 25 August 2010
Der MTA:SA Map Editor erlaubt es dir Maps für Gamemodes zu erstellen.
Starten
Um den Map Editor zu starten, musst du nur auf den "Map Editor" Menüpunkt im MTA Hauptmenü klicken.
Menüs
Sobald der Map Editor gestartet wurde, solltet ihr 2 Menüleisten sehen können: das Hauptmenü am oberen und das Element-Menü am unteren linken Rand des Bildschirms.
Hauptmenü
Die sind die Buttons im Hauptmenü:
 Eine neue Map erstellen.
 Eine bereits exestierende Map öffnen.
 Map speichern.
 Map unter einem anderen Namen speichern.
 Allgmeine Einstellungen des Map Editors verändern.
 Die letzte Aktion rückgängig machen.
 Die letzte Aktion wiederherstellen.
 Liste von gespeicherten Orten und Interriors (Innenräume) anzeigen, zudem kannst du auch eigene Orte und Interriors abspeichern.
 Liste, mit allen Elementen deiner Map, anzeigen. (Objekte, Fahrzeuge, Markierungen, Pickups etc.)
 Map spezifische Einstellungen, wie z.B. Wetter, Tageszeit oder Schwerkraft, ändern. Hier kannst du zudem einstellen mit welchen Gamemodes deine Map kompatibel ist.
 Lade eine editor definition file (EDF) die du benutzen möchtest.
 In den Test-Modus wechseln um deine Map zu testen. Hast du zudem in den Map Einstellungen einen Gamemode angegeben kannst du deine Map sofort mit diesem testen.
Element Menü
Das Element Menü dient zum Hinzufügen neuer Elementer zu deiner Map.
 Erstelle ein neues Fahrzeug
 Erstelle ein neues Objekt (Gebäude, Straßen, Bäume etc.).
 Erstelle ein neues Pickup (Gesundheit, Rüstung, Waffen etc.).
 Erstelle eine neue Makierung.
Zusätzlich kannst du, wenn du eine EDF geladen hast, mit der Maus über das Element Menü fahren und durch scrollen des Mausrades benutzerdefinierte Elemente anzeigen.
Benutzung des Editors
Dieser Abschnitt erklärt wie man Maps erstellt und bearbeitet.
Auf der Map bewegen
Direkt nach dem Starten des Editors, befindest du dich im Kamera-Modus. Mit Hilfe der WASD Tasten kannst du die Kamera bewegen, mit der Maus kannst du die Kamera schwenken. Hälst du wärend du die Kamera bewegst ALT gedrückt bewegt sich die Kamera langsamer, hälst du SHIFT gedrückt bewegt sich diese schneller.
Um auf das Interface (Menüs) des Map Editors zugreifen zu können, musst du in den Mauszeiger-Modus wechseln, dies erreichst du durch drücken der F Taste, drückst du diese erneut gelangst du wieder zurück in den Kamera-Modus. Wärend du im Mauszeiger-Modus bist, ist die Kamera fixiert und du kannst mit Hilfe des Mauszeigers Elemente bearbeiten oder auf die Menüs zugreifen.
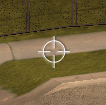
Das du gerade im Kamera-Modus bist erkennst du daran, dass in der Mitte des Bildschirms ein Fadenkreuz zu sehen ist, mit diesem kannst du genau wie im Mauszeiger-Modus Elemente auswählen und bewegen.
Eine neue Map beginnen
- Starte den Editor und drücke im oberen Menü auf den New Button.
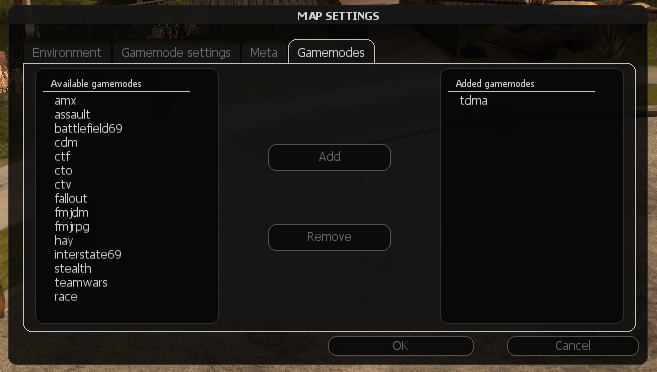
- Drücke nun den Map Settings Button und wechsel in den Meta Tab, trage in das Name Feld den Namen deiner Map ein und in das Author Feld deinen eigenen Namen. Öffne zudem den Gamemodes Tab und füge nun dort die Gamemodes für die deine Map gedacht ist hinzu, dies erreichst du entwerde durch einen Doppel-Klick auf den Namen des Gamemodes oder durch das Drücken des Add Buttons (die Gamemodes sollten sich dann im rechten Feld mit dem Namen Added gamemodes befinden). Klicke OK wenn du fertig bist.
- Klicke jetzt im oberen Menü auf den Definitions Button und füge, ähnlich wie du es gerade mit den Gamemodes getan hast, Ressourcen deren benutzerdifnierte Elemente du nutzen möchtest zur Liste auf der rechten seite des Fensters hinzu. Klicke OK wenn du fertig bist.
Für mehr Informationen zu den EDFs solltest du dir diesen Artikel durchlesen
Neue Elemente erstellen
Das Hinzufügen von Elementen, wie Vehikeln oder Objekten, ist sehr einfach.
- Wechsel zunächst, durch drücken der F Taste in den Mauszeiger-Modus, falls du dich im Kamera-Modus befindest.
- Klicke im Elemnt Menü auf den Button des Elements welches du hinzufügen möchtest, klicke z.B. auf den Button auf dem ein Auto abgebildet ist um neue Vehikel zu erstellen.
- Das entsprechende Element wird erstellt und an den Mauszeiger "gehäftet". Bewege es nun an einen Ort deiner Wahl und drücke die linke Maustaste um das Objekt zu platzieren.
Um benutzerdfinierte Elemente einer Ressource zu erstellen, fahre mit dem Mauszeiger über das Element Menü und scrolle solange mit dem Mausrad bis die gewünschte Ressource und deren Elemente erscheinen.
Beachte das du jedoch zunächst die zur Ressource gehörende EDF im Definitions Fenster hinzugefügt haben musst.
Elemente auswählen
- Linksklick auf ein Element um es im Tastaturmodus auszuwählen.
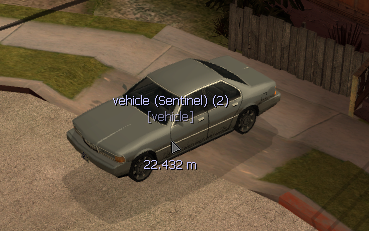
- Rechtsklick auf ein Element um es im Mausmodus auszuwählen.
- Leertaste drücken oder in einen leeren Bereich klicken um die Auswahl aufzuheben.
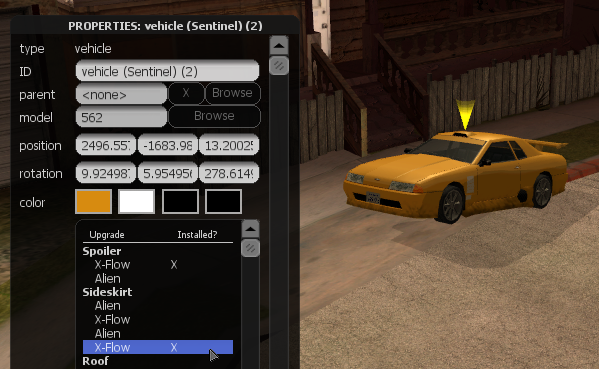
Das ausgewählte Element wird durch eine gelbe konische Markierung hervorgehoben. Elemente (vor allem Objekte) mit mangelhaften Kollisionen können leichter ausgewählt werden, wenn man durch Drücken von E den "High sensitivity mode" aktiviert, der die Erkennung verbessert, aber die Genauigkeit senkt.
Der "Current elements" Dialog kann auch verwendet werden um Elemente auszuwählen. Doppelklick auf ein Element wählt es im Tastaturmodus aus.
Elemente verschieben
Elemente können über verschiedene Wege verschoben werden.
Mit der Maus
- Elemente können über Drag & Drop mit Linksklick verschoben werden.
Oder:
- Wähle das Element im Mausmodus mit (Rechtsklick), bewege es dort hin, wo du es haben willst, und Klicke um es zu platzieren.
Du kannst auch die Distanz von einem Element zur Kamera ändern durch wählen des Kameramodus, Rechtsklick auf das Element, und rollen des Mausrad.
Mit der Tastatur
- Wähle das Element im Tastaturmodus (Linksklick).
- Benutze die Pfeiltasten um das Element horizontal zu bewegen, und PgUp/PgDn um es vertikal zu bewegen. Halte ALT um die Bewegungsgeschwindigkeit zu verringern, oder SHIFT um die Bewegungsgeschwindigkeit zu erhöhen.
By default, elements move relative to the camera and are not locked to any axes. This can be disabled in the Options menu.
Rotating
With the mouse
You can rotate selected elements around the Z axis with the mouse wheel.
- Select the element in keyboard mode (left click) and roll the mouse wheel while holding Left CTRL.
Or:
- Select the element in mouse mode (right click), hold CTRL, and roll the mouse wheel.
With the keyboard
- Select the element in keyboard mode (left click).
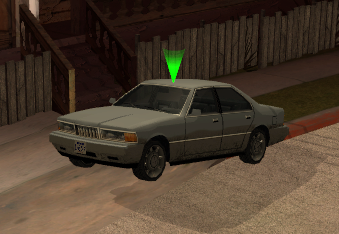
- While holding CTRL (the selection marker will turn green), use the arrow keys and PgUp/PgDn to rotate the element around the different axes.
With both methods you can additionally hold ALT to decrease the rotation speed or SHIFT to increase it.
Changing model and other properties
Most elements have a variety of options that can be altered to change their appearance and behaviour. Examples are the model, color and visual upgrades of a car.
- Open the properties window of an element by either double clicking it or by selecting it and pressing F3.
- Make any alterations that you want. For example, to change the model of a car or object, click the Browse button next to "model" to open the model browser.
- Click OK when you're done.
Cloning
You can clone an element by selecting it and pressing C.
- In mouse mode the cloned element will be attached to your cursor. Left click to place it in the map.
- In keyboard mode the cloned element will be cloned in the identical position.
If you hold CTRL while clicking, the element will be cloned again and will again be attached to the cursor. This way you can easily place large quantities of something.
Alternatively you can use the Pullout button located in the bottom-right corner of the properties box to clone an element.
Deleting
Simply select the element and press DEL (Delete).
Alternatively you can use the Pullout button located in the bottom-right corner of the properties box to delete an element.
Creating maps for specific gamemodes
To make a map for a specific gamemode, you have to do two things:
- Click the Map Settings button in the top menu, go to the Gamemodes tab and add any gamemodes that your map is to be used with.
- You will likely also need to add one or more Editor Definition Files. These will allow you to place gamemode specific elements in the map, like spawnpoints, race checkpoints, or CTF flags. You can add EDF's by clicking the Definitions menu button and adding the relevant gamemodes.
Controls
Here is a list of all default controls. To change them please go to the MTA Settings menu while the Editor is started.
Camera
| camera_move_forwards | w |
| camera_move_backwards | s |
| camera_move_left | a |
| camera_move_right | d |
| high_sensitivity_mode | e |
Cloning
| clone_selected_element | c | |
| clone_drop_modifier | lctrl | (Left CTRL) |
Element manipulation
| element_move_forward | arrow_u | (Arrow key Up) |
| element_move_backward | arrow_d | (Arrow key Down) |
| element_move_left | arrow_l | (Arrow key Left) |
| element_move_right | arrow_r | (Arrow key Right) |
| element_move_downwards | pgdn | (Page Down) |
| element_move_upwards | pgup | (Page Up) |
| zoom_in | mouse_wheel_down | |
| zoom_out | mouse_wheel_up | |
| quick_rotate_increase | mod_rotate + mouse_wheel_up | (Left CTRL + Mouse wheel Up) |
| quick_rotate_decrease | mod_rotate + mouse_wheel_down | (Left CTRL + Mouse wheel Down) |
| mod_rotate | lctrl | (Left CTRL) |
| mod_slow_speed | lalt | (Left ALT) |
| mod_fast_speed | lshift | (Left SHIFT) |
| destroy_selected_element | delete | |
| drop_selected_element | space | |
| pickup_selected_element | F2 | |
| reset_rotation | mod_rotate + r | (Left CTRL + R) |
GUI
| toggle_gui_display | F4 | |
| toggle_cursor | f | |
| select_target_keyboard | mouse1 | (Left Mouse button) |
| select_target_mouse | mouse2 | (Right Mouse button) |
| edf_next | mouse_wheel_up | |
| edf_prev | mouse_wheel_down | |
| undo | Ctrl + z | |
| redo | Ctrl + y | |
| properties_toggle | F3 | |
| browser_up | arrow_u | (Arrow key Up) |
| browser_down | arrow_d | (Arrow key Down) |
| browser_zoom_in | mouse_wheel_up | |
| browser_zoom_out | mouse_wheel_down | |
| browser_confirm | enter | |
| currentelements_up | num_8 | (Numpad key 8) |
| currentelements_down | num_2 | (Numpad key 2) |
| toggle_test | F5 |
Multiplayer
The editor is built with both serverside and clientside components, and therefore supports multiplayer out of the box. To use the editor in multiplayer with other players, simply copy all of the editor's resources into your server, start the editor resource and allow other players to join.
Please note that currently the editor lacks any permissions system, ao all users have access to every function.
Plugins & External resources
The editor allows basic importing of elements from external resources. This is useful for resources that may have to manipulate an element in a specific way that cannot be performed by the editor. For example, a map resource which uses custom models (and has a script to import these models) cannot be manipulated by default within the editor.
By using the import <resourceName> command in console the resource's elements can be imported within the editor.
FAQ
I get a black screen when launching the Map Editor
Usually this is caused due to incorrect installation of Map Editor resources. If you are using a stable MTASA client, please install it again and make sure that you use Client and Server install option.
If you are using a nightly build, to get it working right you need to download latest resources (step 3), unpack the archive and put its contents in: MTA San Andreas\server\mods\deathmatch\resources , where MTA San Andreas is a folder where you've installed MTA San Andreas (default location: C:\Program Files\MTA San Andreas).
Putting them in this path: MTA San Andreas\mods\deathmatch\resources is a common mistake - it won't work if you put them there. So make sure to put them in the italic path above.
If this issue still occurs, even when you've checked the note above and verified that you've installed it correctly, it might be because you've got an outdated acl.xml file. You can download the default one here. It should be placed in server/mods/deathmatch/ in your MTA: San Andreas installation directory.
I get an "Could not start the local server. See console for details" when using the "Map Editor" button
This is because you do not have a valid editor.conf installed. You can download the default one here. It should be placed in server/mods/deathmatch/ in your MTA: San Andreas installation directory.
I have saved a map but cannot find it in my server's resources directory, despite the Editor itself being able to see it
This is due to the fact that Vista/7 limits write-access for non-admin processes in Program Files directory. Files get written in the "VirtualStore" directory instead of real Program Files folder. You should be able to locate your map resource in a similar directory to:
C:\Users\<USERNAME>\AppData\Local\VirtualStore\Program Files\MTA San Andreas\server\mods\deathmatch\resources\
Running the Server/MTA San Andreas with Administrative rights will allow the map to be saved to the proper location.
I have found a bug or have a suggestion/feedback for the map editor
Please use the official bugtracker for reporting bugs. Feel free to also join us on IRC.
