ES/Resource:Editor: Difference between revisions
(Muchas faltas de ortografia, corregidas la mitad.) |
mNo edit summary |
||
| Line 314: | Line 314: | ||
[[ru:Resource:Editor]] | [[ru:Resource:Editor]] | ||
[[en:Resource:Editor]] | |||
[[Category:Incomplete]] | [[Category:Incomplete]] | ||
Revision as of 15:32, 15 January 2011
El editor de mapas de MTA:SA te permite crear mapas para los modos de juegos.
Empezando
Para empezar el editor, simplemente presiona "Map editor" en el menú principal de MTA
Menus
Una vez que el editor haya comenzado, se te mostrarán dos menúes de barras: La principal arriba, y la de elementos a la esquina inferior izquierda.
Menú principal
Estos son los botones en el menú principal:
 Crear un nuevo mapa.
 Abrir un mapa existente.
 Grabar el mapa en que estás trabajando.
 Grabar el mapa bajo un nombre diferente.
 Modificar las opciones generales del editor.
 Deshacer la ultima acción.
 Restaurar la ultima acción deshecha.
 Lista de lugares "favoritos" de GTA.
 Lista de todos los elementos contenidos en el mapa (Autos, Objetos, Marcadores, Pickups, etc).
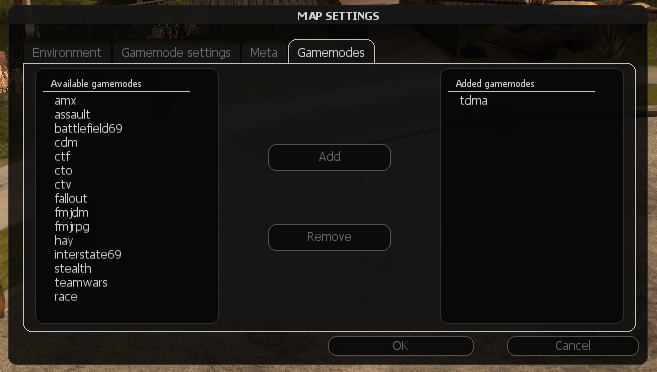
 Propiedades del mapa, como el tiempo, la gravedad, etc. Aquí también puedes especificar los modos de juego que son compatibles con tu mapa.
 Cargar definiciones del editor (EDF) que tú quieras usar
 Probar el mapa.
Menú de elementos
El menú de elementos es usado para agregar nuevos elementos al mapa.
 Crear un nuevo vehículo
 Crear un nuevo objeto (edificios, caminos, basura, árboles, rocas, decoración exterior, etc).
 Crear un nuevo pickup (sólo se puede crear de vida, armadura o armas).
 Crear un nuevo marcador.
Adicionalmente, si tu tienes una definición de editor cargada, girando la rueda del ratón (con el cursor sobre el menú) puedes cargar esos elementos propios.
Usando el editor
Esta sección te explicará cómo crear y modificar mapas.
Moviéndose alrededor del mapa
Cuando inicias el editor, inicias en el modo de cámara. Puedes usar las teclas W, S, A y D para mover la cámara y el ratón para girar la cámara. Cuando te muevas, puedes mantener la tecla ALT para moverte más lento, o la tecla SHIFT para ir más rápido.
Para acceder a la interfaz del editor y al panel de control necesitas cambiar al modo de cursor. Puedes cambiar entre el modo de cursor y el modo de cámara con la tecla F. Cuando estés en modo de cursor, tu vista estará congelada, y solo podrás usar el cursor del ratón para manipular elementos y usar la interfaz gráfica.
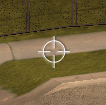
El modo de cámara puede ser reconocido por una mira en medio de la pantalla. Puedes usarla para seleccionar y mover elementos como en el modo de cursor. Esta mira tiene el diseño siguiente:
Empezando un nuevo mapa
- Inicia el editor, o si ya está iniciado, apreta el boton Nuevo del menú.
- Apreta el botón Opciones de mapa. En la pestaña Meta, llena los campos de "Name" y "Author" con el nombre de tu mapa y tu nick en MTA, respectivamente. También abre la pestaña Gamemodes y agrega los modos de juego para los cuales tu mapa está hecho (éstos se van a mover a la lista de Added Gamemodes). Puedes hacer esto seleccionándolos y apretando en Add, o haciendo doble click sobre ellos. Apreta OK cuando estés listo.
- Apreta en la ventana de Definiciones y agrega los recursos en donde uses los elementos alternativos. Estos debieran consistir de los modos que tu seleccionaste en la ventana de Map settings, ademas de eventuales recursos adicionales. Para mas informacion acerca de las definiciones del editor, ve EDF (En Inglés). Apreta OK cuando estes listo.
Creando nuevos elementos
- Si tu estas en el modo de camara, cambia al modo de cursor primero apretando F.
- Apreta un boton en el menu de elementos que represente lo que tu quieres. Ej: Apreta el boton con un auto en el para agregar un vehiculo.
- Un nuevo elemento del tipo seleccionado sera creado y pegado a tu cursor. Muevelo a la posicion que quieras y apreta el botón izquierdo para dejarlo.
Para crear un elemento alternativo que es especifico a un recurso, mueve tu cursor sobre el menu de elementos y gira la rueda del ratón hasta el recurso esperado. Ten en cuenta que para este trabajo, primero necesitas haber agregado el archivo de Definición de editor del recurso en la ventana Definitions.
Seleccionando
- Click izquierdo sobre un elemento para seleccionarlo en modo de teclado.
- Click derecho sobre este elemento para seleccionarlo en modo de ratón.
- Apreta la Barra espaciadora o apreta sobre un area vacia para sacar la selección.
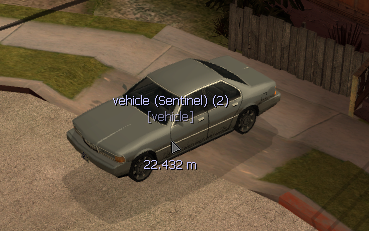
El elemento elegido, si lo hay, es representado por un marcador de cono amarillo. Elementos (particularmente objetos) con pesima colision se peuden detectar facilmente activando el modo de alta sensibilidad, apretando la tecla E. Esto incrementara la detección.
El dialogo Current elements puede ser usado tambien para seleccionar elementos. Has doble-click sobre un item de la lista para seleccionarlo en modo de teclado
Moviendo
Mover elementos se puede hacer de muchas formas.
Con el ratón
- Simplemente pesca y deja con el boton izquierdo
O:
- Selecciona el elemento en el modo de ratón (boton derecho), muevelo hacia la posición que quieras, y apreta para dejarlo.
Tu tambien puedes ajustar la distancia de un elemento acercandolo o alejandolo de la camara mediante el cambio al modo de camara, 'click derecho en un elemento girando la rueda del ratón.
Con el teclado
- Select the element in keyboard mode (left click).
- Use the arrow keys to move the element in the horizontal plane, and PgUp/PgDn to move it vertically. Hold ALT to decrease the movement speed, or SHIFT to increase it.
By default, elements move relative to the camera and are not locked to any axes. This can be disabled in the Options menu.
Rotating
With the mouse
You can rotate selected elements around the Z axis with the mouse wheel.
- Select the element in keyboard mode (left click) and roll the mouse wheel while holding Left CTRL.
Or:
- Select the element in mouse mode (right click), hold CTRL, and roll the mouse wheel.
With the keyboard
- Select the element in keyboard mode (left click).
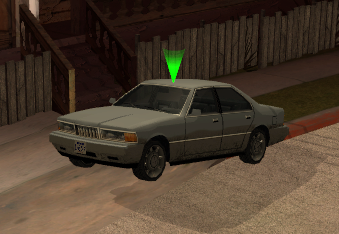
- While holding CTRL (the selection marker will turn green), use the arrow keys and PgUp/PgDn to rotate the element around the different axes.
With both methods you can additionally hold ALT to decrease the rotation speed or SHIFT to increase it.
Changing model and other properties
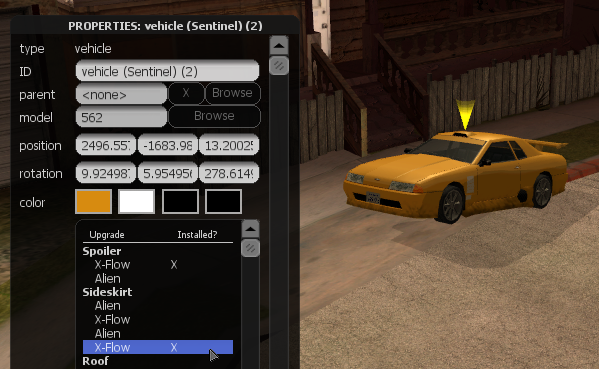
Most elements have a variety of options that can be altered to change their appearance and behaviour. Examples are the model, color and visual upgrades of a car.
- Open the properties window of an element by either double clicking it or by selecting it and pressing F3.
- Make any alterations that you want. For example, to change the model of a car or object, click the Browse button next to "model" to open the model browser.
- Click OK when you're done.
Cloning
You can clone an element by selecting it and pressing C.
- In mouse mode the cloned element will be attached to your cursor. Left click to place it in the map.
- In keyboard mode the cloned element will be cloned in the identical position.
If you hold CTRL while clicking, the element will be cloned again and will again be attached to the cursor. This way you can easily place large quantities of something.
Alternatively you can use the Pullout button located in the bottom-right corner of the properties box to clone an element.
Deleting
Simply select the element and press DEL (Delete).
Alternatively you can use the Pullout button located in the bottom-right corner of the properties box to delete an element.
Creating maps for specific gamemodes
To make a map for a specific gamemode, you have to do two things:
- Click the Map Settings button in the top menu, go to the Gamemodes tab and add any gamemodes that your map is to be used with.
- You will likely also need to add one or more Editor Definition Files. These will allow you to place gamemode specific elements in the map, like spawnpoints, race checkpoints, or CTF flags. You can add EDF's by clicking the Definitions menu button and adding the relevant gamemodes.
Controls
Here is a list of all default controls. To change them please go to the MTA Settings menu while the Editor is started.
Camera
| camera_move_forwards | w |
| camera_move_backwards | s |
| camera_move_left | a |
| camera_move_right | d |
| high_sensitivity_mode | e |
Cloning
| clone_selected_element | c | |
| clone_drop_modifier | lctrl | (Left CTRL) |
Element manipulation
| element_move_forward | arrow_u | (Arrow key Up) |
| element_move_backward | arrow_d | (Arrow key Down) |
| element_move_left | arrow_l | (Arrow key Left) |
| element_move_right | arrow_r | (Arrow key Right) |
| element_move_downwards | pgdn | (Page Down) |
| element_move_upwards | pgup | (Page Up) |
| zoom_in | mouse_wheel_down | |
| zoom_out | mouse_wheel_up | |
| quick_rotate_increase | mod_rotate + mouse_wheel_up | (Left CTRL + Mouse wheel Up) |
| quick_rotate_decrease | mod_rotate + mouse_wheel_down | (Left CTRL + Mouse wheel Down) |
| mod_rotate | lctrl | (Left CTRL) |
| mod_slow_speed | lalt | (Left ALT) |
| mod_fast_speed | lshift | (Left SHIFT) |
| destroy_selected_element | delete | |
| drop_selected_element | space | |
| pickup_selected_element | F2 | |
| reset_rotation | mod_rotate + r | (Left CTRL + R) |
GUI
| toggle_gui_display | F4 | |
| toggle_cursor | f | |
| select_target_keyboard | mouse1 | (Left Mouse button) |
| select_target_mouse | mouse2 | (Right Mouse button) |
| edf_next | mouse_wheel_up | |
| edf_prev | mouse_wheel_down | |
| undo | Ctrl + z | |
| redo | Ctrl + y | |
| properties_toggle | F3 | |
| browser_up | arrow_u | (Arrow key Up) |
| browser_down | arrow_d | (Arrow key Down) |
| browser_zoom_in | mouse_wheel_up | |
| browser_zoom_out | mouse_wheel_down | |
| browser_confirm | enter | |
| currentelements_up | num_8 | (Numpad key 8) |
| currentelements_down | num_2 | (Numpad key 2) |
| toggle_test | F5 |
Multiplayer
The editor is built with both serverside and clientside components, and therefore supports multiplayer out of the box. To use the editor in multiplayer with other players, simply copy all of the editor's resources into your server, start the editor resource and allow other players to join.
Please note that currently the editor lacks any permissions system, ao all users have access to every function.
Plugins & External resources
The editor allows basic importing of elements from external resources. This is useful for resources that may have to manipulate an element in a specific way that cannot be performed by the editor. For example, a map resource which uses custom models (and has a script to import these models) cannot be manipulated by default within the editor.
By using the import <resourceName> command in console the resource's elements can be imported within the editor.
FAQ
I get a black screen when launching the Map Editor
Usually this is caused due to incorrect installation of Map Editor resources. If you are using a stable MTASA client, please install it again and make sure that you use Client and Server install option.
If you are using a nightly build, to get it working right you need to download latest resources (step 3), unpack the archive and put its contents in: MTA San Andreas\server\mods\deathmatch\resources , where MTA San Andreas is a folder where you've installed MTA San Andreas (default location: C:\Program Files\MTA San Andreas).
Putting them in this path: MTA San Andreas\mods\deathmatch\resources is a common mistake - it won't work if you put them there. So make sure to put them in the italic path above.
If this issue still occurs, even when you've checked the note above and verified that you've installed it correctly, it might be because you've got an outdated acl.xml file. You can download the default one here. It should be placed in server/mods/deathmatch/ in your MTA: San Andreas installation directory.
I get an "Could not start the local server. See console for details" when using the "Map Editor" button
This is because you do not have a valid editor.conf installed. You can download the default one here. It should be placed in server/mods/deathmatch/ in your MTA: San Andreas installation directory.
I have saved a map but cannot find it in my server's resources directory, despite the Editor itself being able to see it
This is due to the fact that Vista/7 limits write-access for non-admin processes in Program Files directory. Files get written in the "VirtualStore" directory instead of real Program Files folder. You should be able to locate your map resource in a similar directory to:
C:\Users\<USERNAME>\AppData\Local\VirtualStore\Program Files\MTA San Andreas\server\mods\deathmatch\resources\
Running the Server/MTA San Andreas with Administrative rights will allow the map to be saved to the proper location.
I have found a bug or have a suggestion/feedback for the map editor
Please use the official bugtracker for reporting bugs. Feel free to also join us on IRC.
