Moving Objects Editor: Difference between revisions
Jump to navigation
Jump to search
| Line 21: | Line 21: | ||
Once you attach objects to an object that is going to move, the objects attached to it will move with it. Attaching is very simple. | Once you attach objects to an object that is going to move, the objects attached to it will move with it. Attaching is very simple. | ||
:::'''Just to be clear: the''' '''''child-object''''' '''is attached TO the''' ''''' | :::'''Just to be clear: the''' '''''child-object''''' '''is attached TO the''' '''''parent-object'''''. | ||
# Create the parent-object where you want to attach the child-object to. | # Create the parent-object where you want to attach the child-object to. | ||
# Create the child-object you want to attach to the parent-object, position and rotate it as you like. In the ''Properties''-window of an object ('''to re-open the ''Properties''-window of an object, select the object and press''' ''F3''), set the parent-object as parent. | # Create the child-object you want to attach to the parent-object, position and rotate it as you like. In the ''Properties''-window of an object ('''to re-open the ''Properties''-window of an object, select the object and press''' ''F3''), set the parent-object as parent. | ||
Revision as of 00:02, 3 May 2012
What is it?
With this, you can easily create moving objects in the MTA map-editor. Rotating objects, objects flying from place to place and even triggering them when you hit a marker. It's very easy to install and very easy to use. Please have a look at the tutorials below and enjoy the tool and its endless possibilities!
Installation
Once you have downloaded the file, put it in the resources directory of your MTA-installation:
MTA San Andreas / server / mods / deathmatch / resources
NOTE: The server where your map will be played must also have the resource in the 'resources' directory and the resource must be running!
Starting it up in the map-editor
Once you are in the map editor:
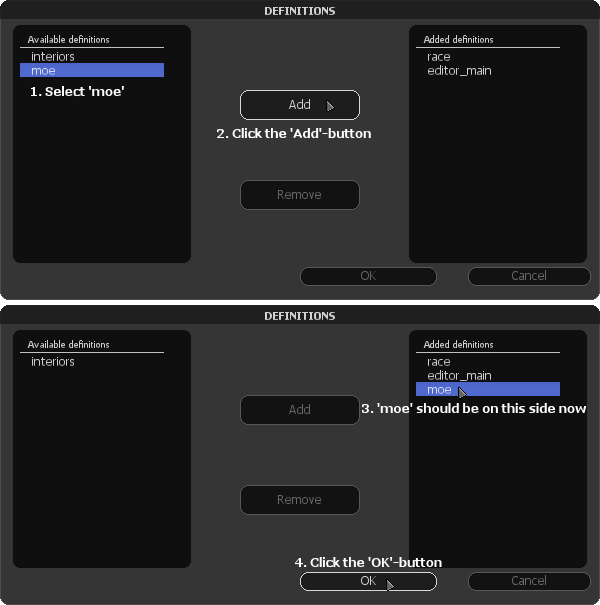
- Click on the Definitions icon.
- Click on moe and click the Add button
- Position your mouse on the buttons on the bottom-left corner
- Scroll your mousewheel until you reach the MOE-buttons
- You are now ready to use it! Don't forget to save!
How to use the tool
Attaching objects
Once you attach objects to an object that is going to move, the objects attached to it will move with it. Attaching is very simple.
- Just to be clear: the child-object is attached TO the parent-object.
- Create the parent-object where you want to attach the child-object to.
- Create the child-object you want to attach to the parent-object, position and rotate it as you like. In the Properties-window of an object (to re-open the Properties-window of an object, select the object and press F3), set the parent-object as parent.
- Click on the Browse-button next to parent
- Select the object you want to attach it to
- Click the OK-button
- Click the OK-button again in the Properties-window


