Moving Objects Editor: Difference between revisions
No edit summary |
|||
| (97 intermediate revisions by the same user not shown) | |||
| Line 1: | Line 1: | ||
[[Image:moe.png | [[Image:moe.png]] | ||
MOE: an | ==What is it?== | ||
With this, you can easily create moving objects in the MTA map-editor. Rotating objects, objects flying from place to place and even triggering them when you hit a marker. It's very easy to install and very easy to use. Please have a look at the tutorials below and enjoy the tool and its endless possibilities! | |||
==Installation== | |||
Once you have downloaded the file, put it in the resources directory of your MTA-installation: | |||
<syntaxhighlight lang="lua">MTA San Andreas / server / mods / deathmatch / resources</syntaxhighlight> | |||
'''''NOTE:''''' The server where your map will be played must also have the resource in the 'resources' directory and the resource must be '''running''' on the background (just start it when the server starts and that's all you have to do). | |||
==Starting it up in the map-editor== | |||
Once you are in the map editor: | |||
# Click on the ''Definitions'' icon. | |||
#: [[Image:Editor_Definitions.png]] | |||
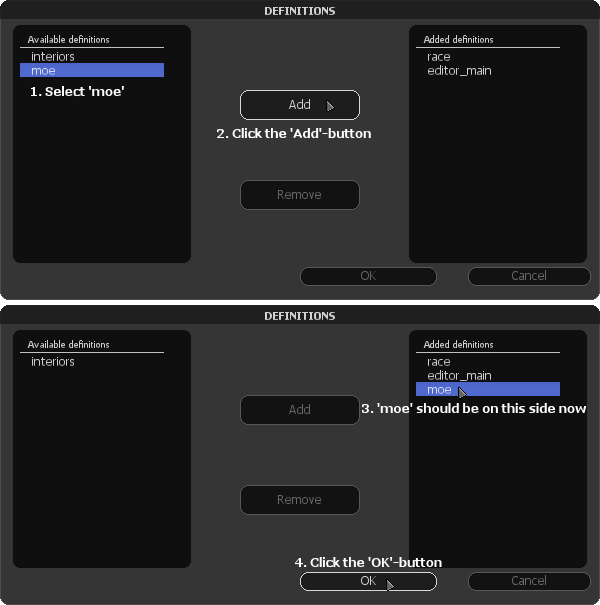
# Click on ''moe'' and click the ''Add'' button | |||
#: [[Image:moe_addedf.png]] | |||
# Position your mouse on the buttons on the bottom-left corner | |||
#: [[Image:moe_scroll1.png]] | |||
# ''Scroll'' your mousewheel until you reach the MOE-buttons | |||
#: [[Image:moe_scroll2.png]] | |||
# You are now ready to use it! Don't forget to save! | |||
==How to use the tool== | |||
===Attaching objects=== | |||
Once you attach objects to an object that is going to move, the objects attached to it will move with it. Attaching is very simple. | |||
:::'''Just to be clear: the''' '''''child-object''''' '''is attached TO the''' '''''parent-object'''''. | |||
# Create the parent-object where you want to attach the child-object to. | |||
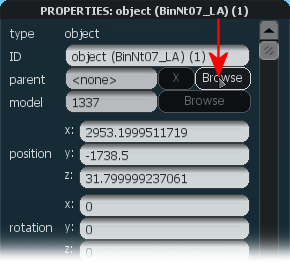
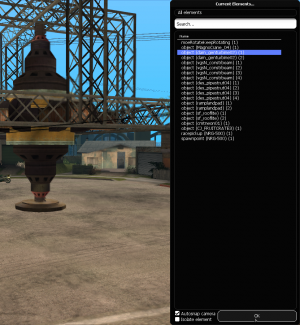
# Create the child-object you want to attach to the parent-object, position and rotate it as you like. In the ''Properties''-window of an object, set the parent-object as parent ('''to re-open the ''Properties''-window of an object, select the object and press''' '''''F3'''''). | |||
## Click on the ''Browse''-button next to ''parent'' | |||
##: [[Image:moe_propset.png]] | |||
## Select the object you want to attach it to (click for enlargement) | |||
##: [[Image:moe_selectob.png|300px]] | |||
## Click the ''OK''-button | |||
## Click the ''OK''-button again in the ''Properties''-window | |||
Done! The attached child-object will now move with the parent-object! | |||
---- | |||
===Rotating: Back and forth=== | |||
[[Image:moe_properties_backforth.png|right]] | |||
[[Image:rotate_backforth.png|left]]Rotating back and forth means rotating like a door: it rotates to 'open' and then rotates back to 'close' again. This sort of movement comes in very handy if you want to make doors that open like the doors in your house. | |||
=====How to assign it===== | |||
#Create the 'back and forth'-element by clicking on the 'back and forth'-icon (displayed above) | |||
#Fill in the data (see below for a description) | |||
#Click the OK-button | |||
#Select the object to which you want to assign the 'back and forth'-rotation | |||
#Press F3, click on 'Browse' next to 'Parent' and select the 'back and forth'-element you just created from the list | |||
#Click the OK-button | |||
#Click the OK-button again in the properties-window | |||
=====Data description===== | |||
This explains what you need to fill in and what every option does. | |||
'''''NOTE: '''''Time is in '''milliseconds'''! (1 second = 1000 milliseconds) If you want it to move for 5 seconds, fill in 5000. | |||
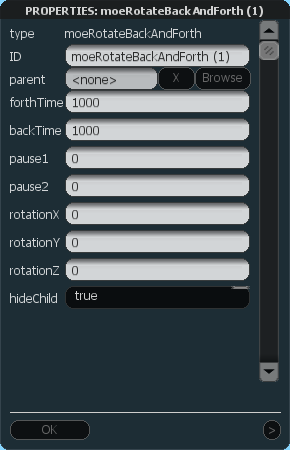
*'''ID''': The name of the element. If you name it properly, it's easier to find it back when you set it as parent later on. | |||
*'''parent''': The parent of this object (doesn't do anything) | |||
*'''forthTime''': The time the rotation forth takes | |||
*'''backTime''': The time the rotation back takes | |||
*'''pause1''': The time to wait before rotating forth | |||
*'''pause2''': The time to wait before rotating back | |||
'''''NOTE 2: '''''At least '''one''' of the rotation-data must be filled in! (rotationX, rotationY or rotationZ) All rotations are in degrees! | |||
*'''rotationX''': Rotation along the X-axis | |||
*'''rotationY''': Rotation along the Y-axis | |||
*'''rotationZ''': Rotation along the Z-axis | |||
*'''hideChild''': Hide the child. If the child for which you set this element as a parent is only functioning as a center of axis and you don't want it to be visible, set it true. Otherwise, set it false. | |||
---- | |||
===Rotating: Repeat rotation=== | |||
[[Image:moe_properties_roundround.png|right]] | |||
[[Image:rotate_roundround.png|left]]Repeat rotation means that it will continue to rotate in the same direction, like a windmill. | |||
=====How to assign it===== | |||
#Create the 'repeat rotation'-element by clicking on the 'repeat rotation'-icon (displayed above) | |||
#Fill in the data (see below for a description) | |||
#Click the OK-button | |||
#Select the object to which you want to assign the 'repeat rotation'-rotation | |||
#Press F3, click on 'Browse' next to 'Parent' and select the 'repeat rotation'-element you just created from the list | |||
#Click the OK-button | |||
#Click the OK-button again in the properties-window | |||
=====Data description===== | |||
This explains what you need to fill in and what every option does. | |||
'''''NOTE: ''''' Time is in '''milliseconds'''! (1 second = 1000 milliseconds) If you want it to move for 5 seconds, fill in 5000. | |||
*'''ID''': The name of the element. If you name it properly, it's easier to find it back when you set it as parent later on. | |||
*'''parent''': The parent of this object (doesn't do anything) | |||
'''''NOTE 2: '''''At least '''one''' of the rotation-data must be filled in! (rotationX, rotationY or rotationZ) All rotations are in degrees! | |||
*'''rotationX''': Rotation along the X-axis | |||
*'''rotationY''': Rotation along the Y-axis | |||
*'''rotationZ''': Rotation along the Z-axis | |||
*'''orbitTime''': The time it takes to complete the rotation | |||
*'''pause''': The time to wait before doing another orbit | |||
*'''hideChild''': Hide the child. If the child for which you set this element as a parent is only functioning as a center of axis and you don't want it to be visible, set it true. Otherwise, set it false. | |||
---- | |||
===Tracks=== | |||
[[Image:moe_properties_track.png|right]] | |||
[[Image:moe_tracks.png|left]]A track is an object that moves along a path, from one point to another, like an elevator/lift, a sliding door or a traintrack. | |||
=====How to assign it===== | |||
#Create all objects you want the track to be based on (place and rotate them as you like) | |||
#When you're done, count the amount of objects that the track will consist of. Create a track that fits the amount of objects. Click the button to create the track (track-buttons are displayed above) | |||
:: 2 objects: 2 OBJS | |||
:: 3-4 objects: MAX. 4 | |||
:: 5-8 objects: MAX. 8 | |||
:: 9-12 objects: MAX. 12 | |||
:: 13-20 objects: MAX. 20 | |||
#Choose the objects, fill in the data | |||
#Click the OK-button | |||
=====Data description===== | |||
This explains what you need to fill in and what every option does. | |||
'''''NOTE: ''''' Time is in '''milliseconds'''! (1 second = 1000 milliseconds) If you want it to move for 5 seconds, fill in 5000. | |||
*'''parent''': The parent of this element (doesn't do anything) | |||
*'''density''': The amount of objects on the track. For example, if you make it 2, the second object will start when the first is halfway the track. If you make it 10, there will be 10 objects going over the track at the same time, following eachother at an equal distance. | |||
*'''trackType''': | |||
:: '''"closed track"''': Objects go from the start to the end and back to the start, like they are following a circle. | |||
:: '''"startpoint to endpoint"''': Objects go from the start to the end, but disappear at the end and re-appear at the beginning. They ''jump'' from the end to the start again, like pacman does when he leaves the level at one side and enters it again at the other side. | |||
*'''object1, object2, object3...''': Click 'Browse' next to it, select an object from the big list and click the OK-button at the bottom of the list. First object ('''object1''') should be the point where the track starts and the last one you fill in, the endpoint. | |||
*'''pause1, pause2, pause3...''': The time to wait before moving to the next point in the track | |||
*'''time1, time2, time3...''': How long the object is moving until it reaches the next point in the track | |||
*'''rotX1, rotY1, rotZ1, rotX2, rotY2, rotZ2...''': The extra rotation, if you want the object to spin, for example. If you don't fill this in, the object will automatically rotate to fit the rotation of the next object in the track. However, if you want it to sping 3 times, you fill in 720 for rotZ. | |||
Latest revision as of 20:29, 3 May 2012
What is it?
With this, you can easily create moving objects in the MTA map-editor. Rotating objects, objects flying from place to place and even triggering them when you hit a marker. It's very easy to install and very easy to use. Please have a look at the tutorials below and enjoy the tool and its endless possibilities!
Installation
Once you have downloaded the file, put it in the resources directory of your MTA-installation:
MTA San Andreas / server / mods / deathmatch / resources
NOTE: The server where your map will be played must also have the resource in the 'resources' directory and the resource must be running on the background (just start it when the server starts and that's all you have to do).
Starting it up in the map-editor
Once you are in the map editor:
- Click on the Definitions icon.
- Click on moe and click the Add button
- Position your mouse on the buttons on the bottom-left corner
- Scroll your mousewheel until you reach the MOE-buttons
- You are now ready to use it! Don't forget to save!
How to use the tool
Attaching objects
Once you attach objects to an object that is going to move, the objects attached to it will move with it. Attaching is very simple.
- Just to be clear: the child-object is attached TO the parent-object.
- Create the parent-object where you want to attach the child-object to.
- Create the child-object you want to attach to the parent-object, position and rotate it as you like. In the Properties-window of an object, set the parent-object as parent (to re-open the Properties-window of an object, select the object and press F3).
Done! The attached child-object will now move with the parent-object!
Rotating: Back and forth
Rotating back and forth means rotating like a door: it rotates to 'open' and then rotates back to 'close' again. This sort of movement comes in very handy if you want to make doors that open like the doors in your house.
How to assign it
- Create the 'back and forth'-element by clicking on the 'back and forth'-icon (displayed above)
- Fill in the data (see below for a description)
- Click the OK-button
- Select the object to which you want to assign the 'back and forth'-rotation
- Press F3, click on 'Browse' next to 'Parent' and select the 'back and forth'-element you just created from the list
- Click the OK-button
- Click the OK-button again in the properties-window
Data description
This explains what you need to fill in and what every option does.
NOTE: Time is in milliseconds! (1 second = 1000 milliseconds) If you want it to move for 5 seconds, fill in 5000.
- ID: The name of the element. If you name it properly, it's easier to find it back when you set it as parent later on.
- parent: The parent of this object (doesn't do anything)
- forthTime: The time the rotation forth takes
- backTime: The time the rotation back takes
- pause1: The time to wait before rotating forth
- pause2: The time to wait before rotating back
NOTE 2: At least one of the rotation-data must be filled in! (rotationX, rotationY or rotationZ) All rotations are in degrees!
- rotationX: Rotation along the X-axis
- rotationY: Rotation along the Y-axis
- rotationZ: Rotation along the Z-axis
- hideChild: Hide the child. If the child for which you set this element as a parent is only functioning as a center of axis and you don't want it to be visible, set it true. Otherwise, set it false.
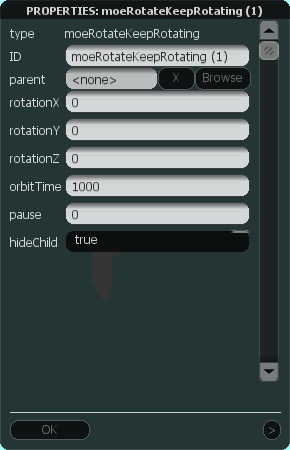
Rotating: Repeat rotation
Repeat rotation means that it will continue to rotate in the same direction, like a windmill.
How to assign it
- Create the 'repeat rotation'-element by clicking on the 'repeat rotation'-icon (displayed above)
- Fill in the data (see below for a description)
- Click the OK-button
- Select the object to which you want to assign the 'repeat rotation'-rotation
- Press F3, click on 'Browse' next to 'Parent' and select the 'repeat rotation'-element you just created from the list
- Click the OK-button
- Click the OK-button again in the properties-window
Data description
This explains what you need to fill in and what every option does.
NOTE: Time is in milliseconds! (1 second = 1000 milliseconds) If you want it to move for 5 seconds, fill in 5000.
- ID: The name of the element. If you name it properly, it's easier to find it back when you set it as parent later on.
- parent: The parent of this object (doesn't do anything)
NOTE 2: At least one of the rotation-data must be filled in! (rotationX, rotationY or rotationZ) All rotations are in degrees!
- rotationX: Rotation along the X-axis
- rotationY: Rotation along the Y-axis
- rotationZ: Rotation along the Z-axis
- orbitTime: The time it takes to complete the rotation
- pause: The time to wait before doing another orbit
- hideChild: Hide the child. If the child for which you set this element as a parent is only functioning as a center of axis and you don't want it to be visible, set it true. Otherwise, set it false.
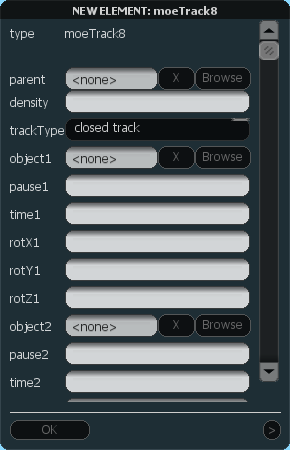
Tracks
A track is an object that moves along a path, from one point to another, like an elevator/lift, a sliding door or a traintrack.
How to assign it
- Create all objects you want the track to be based on (place and rotate them as you like)
- When you're done, count the amount of objects that the track will consist of. Create a track that fits the amount of objects. Click the button to create the track (track-buttons are displayed above)
- 2 objects: 2 OBJS
- 3-4 objects: MAX. 4
- 5-8 objects: MAX. 8
- 9-12 objects: MAX. 12
- 13-20 objects: MAX. 20
- Choose the objects, fill in the data
- Click the OK-button
Data description
This explains what you need to fill in and what every option does.
NOTE: Time is in milliseconds! (1 second = 1000 milliseconds) If you want it to move for 5 seconds, fill in 5000.
- parent: The parent of this element (doesn't do anything)
- density: The amount of objects on the track. For example, if you make it 2, the second object will start when the first is halfway the track. If you make it 10, there will be 10 objects going over the track at the same time, following eachother at an equal distance.
- trackType:
- "closed track": Objects go from the start to the end and back to the start, like they are following a circle.
- "startpoint to endpoint": Objects go from the start to the end, but disappear at the end and re-appear at the beginning. They jump from the end to the start again, like pacman does when he leaves the level at one side and enters it again at the other side.
- object1, object2, object3...: Click 'Browse' next to it, select an object from the big list and click the OK-button at the bottom of the list. First object (object1) should be the point where the track starts and the last one you fill in, the endpoint.
- pause1, pause2, pause3...: The time to wait before moving to the next point in the track
- time1, time2, time3...: How long the object is moving until it reaches the next point in the track
- rotX1, rotY1, rotZ1, rotX2, rotY2, rotZ2...: The extra rotation, if you want the object to spin, for example. If you don't fill this in, the object will automatically rotate to fit the rotation of the next object in the track. However, if you want it to sping 3 times, you fill in 720 for rotZ.

