PIMP: Difference between revisions
| Line 53: | Line 53: | ||
===PIMP-elements and their options=== | ===PIMP-elements and their options=== | ||
---- | ---- | ||
==== | ====[[Image:2dtext.png]]2D Text==== | ||
'''''NOTE: '''''Time is in '''milliseconds'''! (1 second = 1000 milliseconds) If you want it to move for 5 seconds, fill in 5000. | '''''NOTE: '''''Time is in '''milliseconds'''! (1 second = 1000 milliseconds) If you want it to move for 5 seconds, fill in 5000. | ||
| Line 71: | Line 71: | ||
---- | ---- | ||
====3D Text==== | ====3D Text==== | ||
Revision as of 12:08, 17 May 2012
What is it?
PIMP is for actions on markers. Teleports, handling, text on your screen, creating filmic scenes and much more: it's all there and very easy to use! This tutorial explains how to use the tool, what the options are for and more.
Enjoy!
Installation
Once you have downloaded the file, put it in the resources directory of your MTA-installation:
MTA San Andreas / server / mods / deathmatch / resources
NOTE: The server where your map will be played must also have the resource in the 'resources' directory and the resource must be running on the background (just start it when the server starts and that's all you have to do).
Starting it up in the map-editor
Once you are in the map editor:
- Click on the Definitions icon.
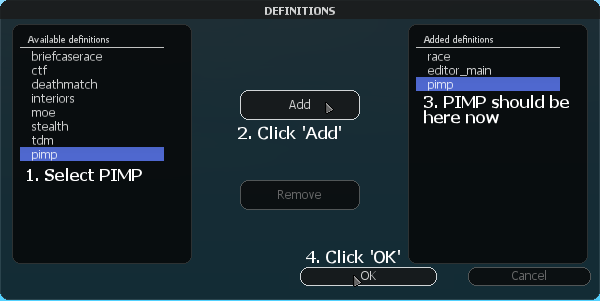
- Click on pimp and click the Add button
- Position your mouse on the buttons on the bottom-left corner
- Scroll your mousewheel until you reach the PIMP-buttons
- You are now ready to use it! Don't forget to save!
How to use the tool
PIMP works with markers. For example, you add a teleport-element to a marker and when you hit that marker, you are teleported.
Creating a PIMP-element and adding it to a marker
- Position your mouse on the bottom-left icons and scroll until you reach the default elements:
- Click the "marker"-button to create a marker:
- Place it somewhere, select it and press the "F3"-key on your keyboard.
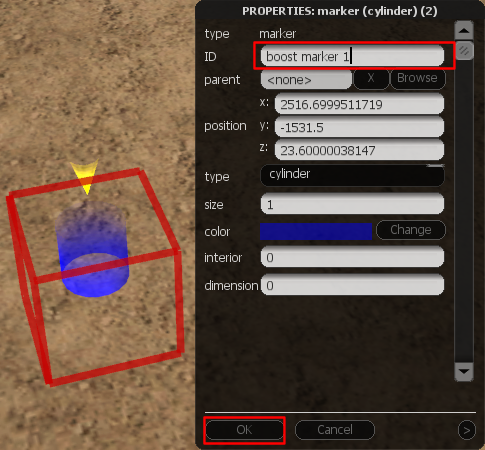
- Fill in a decent name in the "ID"-box. If you're going to add a boost to it for example, name it "boost marker 1". Then click on the "OK"-button.
- Click on one of the PIMP-elementbuttons on the bottomleft corner of your screen:
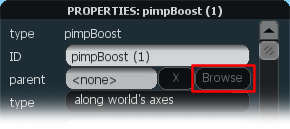
- Click on the "Browse"-button next to "parent":
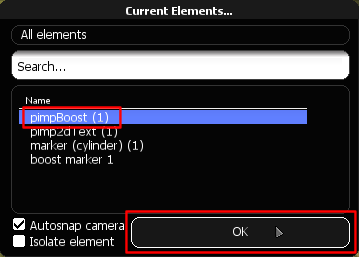
- Choose the marker you just created and click on the "OK"-button:
Fill in the other options and hit the "OK"-button at the bottom of the window again to save.
You're done!
IMPORTANT: Sometimes the "parent" isn't saved properly when you click on "OK"!
This is a bug in the editor and it appears mostly at the "Teleport"- and "Camera Position"-elements!
You can check this by opening the elements-list:
![]()
Doubleclick on your PIMP-element in the list (properties window of that element should appear) and if it says <none> in the "parent"-box, set a new parent by clicking the "Browse button", as described above.
PIMP-elements and their options
 2D Text
NOTE: Time is in milliseconds! (1 second = 1000 milliseconds) If you want it to move for 5 seconds, fill in 5000.
- ID: The name of the element. If you name it properly, it's easier to find it back when you set it as parent later on.
- text: Text to be displayed. Use #N to start a new line and use normal colorcodes (#ffaa00 etc.) to change the color. For example: This is the first line#NThis is the second line and #ff0000this text is now red
- time: Time for the text to be displayed (milliseconds).
- fadeTime: Time the fade-in and fade-out take (milliseconds).
- size: Size of the text. Default is 2, 1 is normal small text like in the chatbox.
- font: Font the text is written in.
- color: Color of the text. However, this can be overridden if you use colorcodes (#ffaa00 etc).
- shadow: Shadow on (true) or off (false).
- alignX: Horizontally align the text left, center or right.
- alignY: Vertically align the text at the top, center or bottom.
- screenX: Horizontal position of the text on the screen, between 0 and 1. For example, 0 means left, 0.5 is the middle.
- screenY: Vertical position of the text on the screen, between 0 and 1. For example, 0 means top and 0.5 is the middle.
- hideMarkers: Make the marker invisble (true) or don't (false).
3D Text
- ID: The name of the element. If you name it properly, it's easier to find it back when you set it as parent later on.
- text: Text to be displayed. Use #N to start a new line and use normal colorcodes (#ffaa00 etc.) to change the color. For example: This is the first line#NThis is the second line and #ff0000this text is now red
- maxDistance: Maximum distance for the text to be visible.
- scaling: Scaling of the text, when further away, on (true) or off (false).
- fading: Fading of the text, when further away, on (true) or off (false).
- size: Size of the text. Default is 2, 1 is normal small text like in the chatbox.
- font: Font the text is written in.
- color: Color of the text. However, this can be overridden if you use colorcodes (#ffaa00 etc).
- shadow: Shadow on (true) or off (false).
- alignX: Horizontally align the text left, center or right.
- alignY: Vertically align the text at the top, center or bottom.
- hideMarkers: Make the marker invisble (true) or don't (false).
Teleport
NOTE: Time is in milliseconds! (1 second = 1000 milliseconds) If you want it to move for 5 seconds, fill in 5000.
- ID: The name of the element. If you name it properly, it's easier to find it back when you set it as parent later on.
- teleportTo: Select the vehicle you created. You will be teleported to the position and rotation of this vehicle.
- velocity: After teleportation, change the velocity (fill in velocityX, velocityY, velocityZ) or keep old velocity.
- velocityX, velocityY, velocityZ: New X-, Y- and Z-velocity after teleportation.
- turnVelocity: After teleportation, change the turnVelocity (fill in turnVelX, turnVelY, turnVelZ) or keep old turnvelocity.
- turnVelX, turnVelY, turnVelZ: New X-, Y- and Z-turnvelocity after teleportation.
- freezeTime: Time the vehicle should remain frozen after teleportation (milliseconds).
- fadeScreen: Set true to fade-out to a black screen and fade-in again after teleportation.
- fadeTime: Time the fade-in and fade-out take (milliseconds).
- hideMarkers: Make the marker invisble (true) or don't (false).


