RU/Resource:Editor: Difference between revisions
No edit summary |
|||
| Line 47: | Line 47: | ||
===Запуск карты=== | ===Запуск карты=== | ||
* Запустите редактор, выберите в меню ''New''. | * Запустите редактор, выберите в меню ''New''. | ||
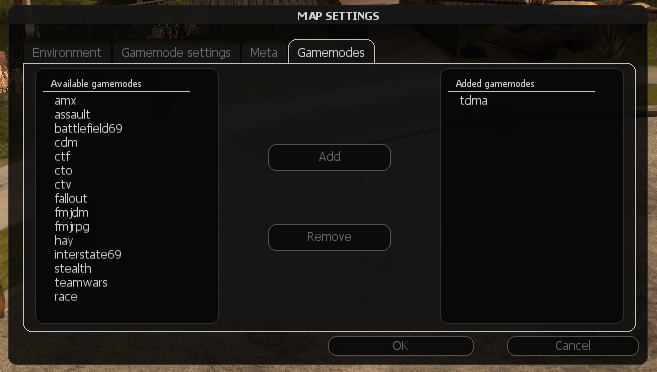
* Выберите ''Map settings''. В ''Meta'' | * Выберите ''Map settings''. В разделе ''Meta'' заполните все поля. Откройте ''Gamemodes'' и добавьте игровой мод к вашей карте (Переместите их в список ''Added gamemodes''). Вы можете делать это выбирая и нажимая ''Add'', или двойным кликом по нему. Нажмите ОК когда закончите. | ||
[[Image:Editor_Mapsettings.png|center]] | [[Image:Editor_Mapsettings.png|center]] | ||
* | * Выберите пункт ''Definitions'' и добавьте ресурсы, которые вы хотите использовать как стандартные элементы. These will consist of the gamemodes you selected in the ''Map settings'' window, plus eventual additional resources. For more information about editor definitions, see [[Resource:Editor/EDF|EDF]]. Click OK when you're done. | ||
===Создание новых элементов=== | ===Создание новых элементов=== | ||
Revision as of 12:18, 9 November 2009
MTA:SA Редактор Карт позволяет создавать карты для вашего игрового мода.
Начало
Чтобы запустить редактор, просто нажмите на кнопку "Map editor" в главном меню MTA.
Меню
После запуска вы увидите два меню: в главном меню вверху, и элемент меню в левом нижнем углу.
Главное меню
Это меню состоит из нескольких кнопок:
 Создать новую карту.
 Открыть существующую карту.
 Сохранить карту.
 Сохраните карту под другим именем.
 Общие настройки карты.
 Отменить последнее действие.
 Восстановить отмененное действие.
 Сохраненные местоположения мира игры. Редактор идет с большим списком местоположений Интерьера San Andreas, но Вы можете также добавить свои собственные внутренние и внешние местоположения к списку.
 Все элементы, которые содержит карта (Объекты, транспорт маркеры, пикапы и т. п.)
 Настройки карты, такие как как время дня, сила тяжести и т.д. Здесь Вы можете также определить, с каким модом (gamemode) будет совместима ваша карта
 Загрузить editor definition files (EDF)которые вы хотите использовать.
 Вход в игру для тестирования вашей карты.
Элементы меню
Эти кнопки позволяют добавлять новые объекты на вашу карту.
 Создать новую машину.
 Создать новый объект (Здания, дороги и другие декорации).
 Создать новый пикап.
 Создать новый маркер.
Additionally, if you have editor definitions loaded, you can roll the mousewheel in this menu to bring up custom elements.
Использование редактора
Этот раздел научит вас создавать и редактировать карты.
Перемещение по карте
Когда вы запускаете редактор, у вас включен режим camera mode(Режим камеры). Используйте клавиши WSAD и мышь для управления камерой. Если вам нужно перемещать объект или камеру медленнее, зажмитеALT, для быстрого перемещения, используйте SHIFT.
Чтобы получить доступ к панели управления редактором, перейдите в cursor mode(Режим курсора). Вы можете переключаться между режимом курсора и режимом камеры, нажимая F. Когда вы в режиме курсора, позиция камеры зафиксирована, и вы можете использовать курсор для управления элементами карты и интерфейсом.
Режим камеры может быть полезен для быстрого перемещения по карте. Вы можете использовать его для выбора и перемещения элементов.
Запуск карты
- Запустите редактор, выберите в меню New.
- Выберите Map settings. В разделе Meta заполните все поля. Откройте Gamemodes и добавьте игровой мод к вашей карте (Переместите их в список Added gamemodes). Вы можете делать это выбирая и нажимая Add, или двойным кликом по нему. Нажмите ОК когда закончите.
- Выберите пункт Definitions и добавьте ресурсы, которые вы хотите использовать как стандартные элементы. These will consist of the gamemodes you selected in the Map settings window, plus eventual additional resources. For more information about editor definitions, see EDF. Click OK when you're done.
Создание новых элементов
AДОбавлять новые элементы на карту очень просто!d.
- Если вы в режиме камеры, переключитесь к курсору кнопкой F.
- Кликните о нужной кнопке добавления объекта. Например, нажмите на кнопку Car для добавления автомобилей.
- Созданные вами объекты можно двигать.Зажмите на объекте левую кнопку мыши и перемещайте его.
To create custom elements that are specific to a resource, hover the cursor over the element menu and turn the scroll wheel until the desired resource comes up. Note that for this to work, you first have to add the EDF file of the resource in the Definitions window.
Выбор
- Left click an element to select it in keyboard mode.
- Right click it to select it in mouse mode.
- Press the Spacebar or click in an empty area to deselect.
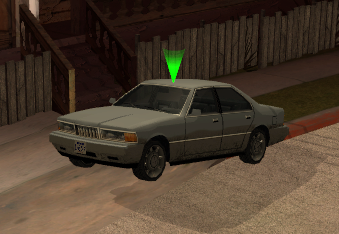
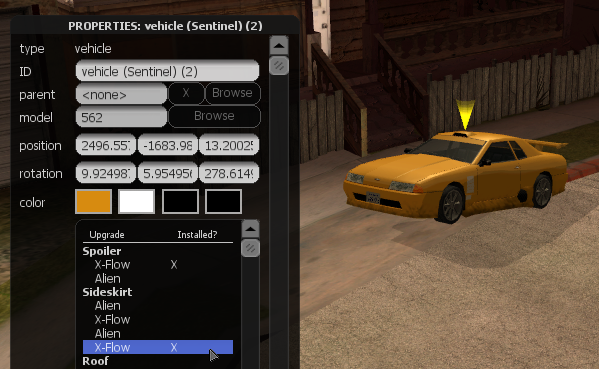
The selected element, if any, is denoted by a yellow cone marker. Elements (particularly objects) with poor collisions can be detected easier by enabling High sensitivity mode, by pressing the E key. This increases detection at the expense of accuracy.
The Current elements dialog can also be used to select elements. Double-clicking an item within the list will select it in Keyboard mode.
Перемещение
Moving elements can be done in several ways.
With the mouse
- Simply drag and drop with the left mouse button.
Or:
- Select the element in mouse mode (right click), move it to where you want it, and click to drop it off.
You can also adjust the Hold distance of an element toward and away from the camera by switching to camera mode, right clicking the element, and rolling the mouse wheel.
With the keyboard
- Select the element in keyboard mode (left click).
- Use the arrow keys to move the element in the horizontal plane, and PgUp/PgDn to move it vertically. Hold ALT to decrease the movement speed, or SHIFT to increase it.
By default, elements move relative to the camera and are not locked to any axes. This can be disabled in the Options menu.
Вращение
With the mouse
You can rotate selected elements around the Z axis with the mouse wheel.
- Select the element in keyboard mode (left click) and roll the mouse wheel while holding Left CTRL.
Or:
- Select the element in mouse mode (right click), hold CTRL, and roll the mouse wheel.
With the keyboard
- Select the element in keyboard mode (left click).
- While holding CTRL (the selection marker will turn green), use the arrow keys and PgUp/PgDn to rotate the element around the different axes.
With both methods you can additionally hold ALT to decrease the rotation speed or SHIFT to increase it.
Настройки модели
У большинства элементов есть множество вариантов настроек, которые нужны, чтобы изменить их внешность и поведение. Примеры - модель, цвет и визуальные модернизации автомобиля.
- Откройте окно свойств элемента двойным щелчком на нем или нажав клавишу "F3".
- Сделайте изменения по вашему усмотрению. Например, чтобы изменить модель автомобиля или объекта, щелкните кнопку "Browse " рядом с "model", чтобы открыть браузер моделей.
- Нажмите OK для закрытия и сохранения.
Копирование
Вы можете клонировать элемент, выбирая его и нажимая C.
- In mouse mode the cloned element will be attached to your cursor. Left click to place it in the map.
- In keyboard mode the cloned element will be cloned in the identical position.
If you hold CTRL while clicking, the element will be cloned again and will again be attached to the cursor. This way you can easily place large quantities of something.
Alternatively you can use the Pullout button located in the bottom-right corner of the properties box to clone an element.
Удаление
Simply select the element and press DEL (Delete).
Alternatively you can use the Pullout button located in the bottom-right corner of the properties box to delete an element.
Управление
Here is a list of all default controls. To change them please go to the MTA Settings menu while the Editor is started.
Камера
| camera_move_forwards | w |
| camera_move_backwards | s |
| camera_move_left | a |
| camera_move_right | d |
| high_sensitivity_mode | e |
Клонирование
| клонировать выбранный элемент | c | |
| clone_drop_modifier | lctrl | (Left CTRL) |
Манипуляции с элементами
| element_move_forward | arrow_u | (Arrow key Up) |
| element_move_backward | arrow_d | (Arrow key Down) |
| element_move_left | arrow_l | (Arrow key Left) |
| element_move_right | arrow_r | (Arrow key Right) |
| element_move_downwards | pgdn | (Page Down) |
| element_move_upwards | pgup | (Page Up) |
| zoom_in | mouse_wheel_down | |
| zoom_out | mouse_wheel_up | |
| quick_rotate_increase | mod_rotate + mouse_wheel_up | (Left CTRL + Mouse wheel Up) |
| quick_rotate_decrease | mod_rotate + mouse_wheel_down | (Left CTRL + Mouse wheel Down) |
| mod_rotate | lctrl | (Left CTRL) |
| mod_slow_speed | lalt | (Left ALT) |
| mod_fast_speed | lshift | (Left SHIFT) |
| destroy_selected_element | delete | |
| drop_selected_element | space | |
| pickup_selected_element | F2 | |
| reset_rotation | mod_rotate + r | (Left CTRL + R) |
GUI
| toggle_gui_display | F4 | |
| toggle_cursor | f | |
| select_target_keyboard | mouse1 | (Left Mouse button) |
| select_target_mouse | mouse2 | (Right Mouse button) |
| edf_next | mouse_wheel_up | |
| edf_prev | mouse_wheel_down | |
| Отменить | Ctrl + z | |
| Вернуть | Ctrl + y | |
| properties_toggle | F3 | |
| browser_up | arrow_u | (Arrow key Up) |
| browser_down | arrow_d | (Arrow key Down) |
| browser_zoom_in | mouse_wheel_up | |
| browser_zoom_out | mouse_wheel_down | |
| browser_confirm | enter | |
| currentelements_up | num_8 | (Numpad key 8) |
| currentelements_down | num_2 | (Numpad key 2) |
| toggle_test | F5 |
Мультиплеер
The editor is built with both serverside and clientside components, and therefore supports multiplayer out of the box. To use the editor in multiplayer with other players, simply copy all of the editor's resources into your server, start the editor resource and allow other players to join.
Please note that currently the editor lacks any permissions system, ao all users have access to every function.
Плагины и внешние ресурсы
The editor allows basic importing of elements from external resources. This is useful for resources that may have to manipulate an element in a specific way that cannot be performed by the editor. For example, a map resource which uses custom models (and has a script to import these models) cannot be manipulated by default within the editor.
By using the import <resourceName> command in console the resource's elements can be imported within the editor.
FAQ
I get an "Could not start the local server. See console for details" when using the "Map Editor" button
This is because you do not have a valid editor.conf installed. You can download the default one here. It should be placed in server/mods/deathmatch/ in your MTA: San Andreas installation directory.
I have saved a map but cannot find it in my server's resources directory, despite the Editor itself being able to see it
This is due to the fact that Vista limits write-access for non-admin processes in Program Files directory. Files get written in the "VirtualStore" dir instead of real Program Files folder. You should be able to locate your map resource in a similar directory to:
C:\Users\<USERNAME>\AppData\Local\VirtualStore\Program Files\MTA San Andreas\server\mods\deathmatch\resources\
Running the Server/MTA San Andreas with Administrative rights will allow the map to be saved to the proper location.
I have found a bug or have a suggestion/feedback for the map editor
Please use the official bugtracker for reporting bugs. Feel free to also join us on IRC.
Insert non-formatted text here
