Resource:Admin: Difference between revisions
No edit summary |
m (Updated) |
||
| Line 10: | Line 10: | ||
</section> | </section> | ||
To add an account in '''MTA | To add an account in '''MTA {{padleft:|3|{{Current Version|full}}}}''' use the following command in the server | ||
'''Note:''' The server needs to run for this action | '''Note:''' The server needs to run for this action | ||
Revision as of 21:50, 24 January 2012
A quick tutorial on how to get admin rights and install admin resource.
To add an account in MTA 1.6 use the following command in the server
Note: The server needs to run for this action
addaccount <username> <password>
Note: Server should not be running when you are editing the acl file below
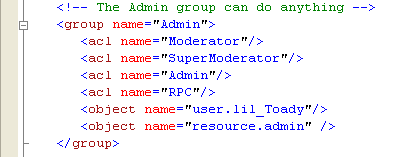
Then you open the acl.xml file located in the same folder and add yourself as an object to the Admin group by using the 'user.*' syntax, where * would be your account name.
Now open your mtaserver.conf file and scroll to the bottom, make sure the admin resource is added to the ones that start with the server (note: protected="1" means that it can not be stopped).
Now that you're done with server files, you can you can finally start it. Connect to the server itself and login with your account details: use 'login [username] <password>'. If it tells you to press 'p' you have done everything right, congratulations! If not, do this from the very beginning.


