HU/Resource:Editor
Az MTA:SA map editor lehetővé teszi, hogy map-okat hozzon létre gamemode-ok számára.
Kezdés
Az editor elindításához csak egyszerűen kattintos a "Map editor" menüpontra az MTA főmenüjében.
Menük
Miután elindult az editor, két menüsáv fog megjelenni: a főmenü a tetején, és az elem menü a bal alsó sarkoban.
Főmenü
Ezeket a gombokat láthatja a főmenüben:
 Új map létrehozása.
 Meglévő map megnyitása.
 Az aktuális map elmentése.
 A map elmentése egy másik névre.
 Az általános map editor beállításainak módosítása.
 Az utolsó művelet visszavonása.
 Visszaállítja az utolsó befejezetlen műveletet.
 A játék tárolt helyszínei. Az editor tartalmaz egy jelentő mértékű Interior helyszínt a San Andreas-ból, emelett készíthet saját interiort és non-interior helyszínt a listához.
 Listázza a map összes elemét (objektek, járművek, markerek, pickup-ok, stb.)
 A map sajátos beállításai, mint a napszak, gravitáció stb. Itt megadhatja, hogy a map milyen gamemódokkal legyen kompatibilis.
 Load editor definition files (EDF) that you want to use.
 Play mode-ba helyez, hogy kipróbálhassa a mapot. Ez betölti a gamemode-ot, amelyre a map készült.
Elem menü
Az elem menü a maphoz új elemek hozzáadására szolgál.
 Egy új jármű létrehozása.
 Egy új object létrehozása (épületek, utak és más elemek).
 Egy új pickup létrehozása (health, armor, weapons and custom).
 Egy új marker létrehozása (checkpoint, ring, cylinder, arrow and corona).
 World object kiválasztása.
Additionally, if you have editor definitions loaded, you can roll the mousewheel in this menu to bring up custom elements.
Az editor használata
Ez a rész ismerteti a mapok létrehozásának és módosításának módját.
Mozgás a map körül
Amikor először elindítja az editort, akkor camera mode-ban van. A WSAD gombokkal és az egérrel mozgathatja a kamerát. Mozgás közben az ALT lenyomásával lassíthatja, vagy a SHIFT-el gyorsíthatja a kamera mozgását.
Az editor kezelőfelületének és a kezelőpaneljének eléréséhez át kell váltania 'kurzor módba'. Az F gomb használatával tud váltani a kurzor mód és a kamera mód között. Kurzor módban a nézet rögzített, és az egérrel tudja mozgatni az elemeket és használni a grafikus felületet.
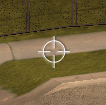
A kamera módot a képernyő közepén található keresztel lehet felismerni. Használhatja az elemek kijelöléséhez és mozgatásához, csakúgy, mint a kurzor módban.
Egy új map indítása
- Indítsa el az editort, vagy ha már elindította kattintson a New menü gombra.
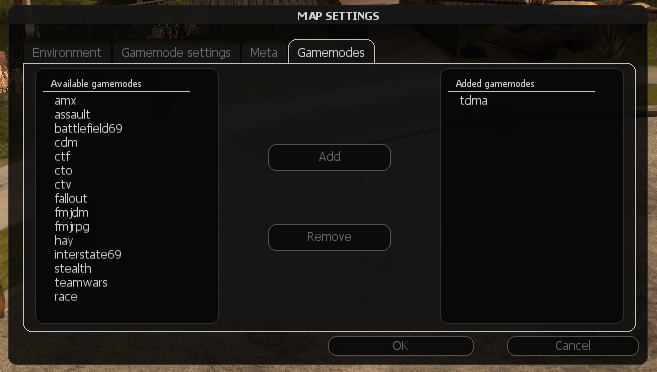
- Kattintson a Map settings gombra. A Meta fülben töltse ki a Name és az Author mezőket a map nevével, illetve az Ön nevével. Valamint nyissa meg a Gamemodes fület, és addja hozzá azokat a gamemódokat, amelyekre a map készült (Added gamemodes listához lesznek helyezve). Ezt úgy teheti meg, hogy kiválasztja őket, majd rákattint az Add gombra, vagy kéttszer rájuk kattint. Majd kattintson az OK-ra, ha készen van.
- Kattintson a Definitions ablakra és adja hozzá azokat a resource-okat, amelyekhez az egyéni elemeket szeretné használni. Ezek a "Map settings" ablakban kiválasztott gamemode-ekből és esetleges további resource-kből állnak. További infórmáciért az editor definitions-ról olvassa el az EDF oldalt. Majd kattintson az OK-ra, ha készen van.
Új elem létrehozása
Nagyon egyszerűen adhat hozzá elemeket a maphoz, például járműveket, objekteket.
- Ha kamera módban van, akkor váltson kurzor módba az F megnyomásával.
- Kattintson az element menüben lévő gombra, amely a kívánt tartalmat jelöli. Például kattintson a jármű gombra egy jármű hozzáadásához.
- A kiválasztott típus egy új eleme lesz létrehozva és hozzácsatolva a kurzorhoz. Helyezze arra a helyre, ahova szeretné, és a bal egérrel engedje el.
Egyéni elemek létrehozásához, melyek a resource-ra jellemzőek vigye az egerét az element menü fölé, és görgessen addig, míg a kívánt resource elő nem jön. Vegye figyelembe, hogy ennek működése érdekében hozzá kell adnia a resource EDF fájlját a Definitions ablakba.
Kiválasztás
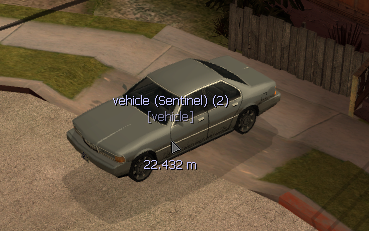
- A bal egérrel kattintson egy elemre, hogy kiválassza azt billentyűzet módban.
- A jobb egérrel kattintson hogy kiválassza azt egér módban.
- Nyomja meg a Szóközt, vagy kattintson egy üres területre a kijelölés megszüntetéséhez.
A kiválasztott elemeket, ha van, sárga kurzorral jelöltük. Kevés collisionnal rendelkező elemeket (különösen az objektek) könnyen észlelni tudjuk a High sensitivity mode aktiválásával az E gomb lenyomásával.
A Current elements is használható az elemek kiválasztásához. A listában szereplő elemre való dupla kattintás kiválasztja azt billentyűzet módba.
Mozgatás
Az elemeket többféle módon is tudja mozgatni.
Az egérrel
- Egyszerűen csak húzza, majd tegye le a bal egérgombbal.
vagy:
- Válassza ki az elemet egér módban (jobb egér), vigye oda, ahová szeretené, majd tegye le.
A kameramód használatával is tudja az elemek távolságát állítani, hogy távolabb, vagy közelebb legyen a kamerához, jobb egérrel kattintson az elemre majd görgessen az egérrel egérgörgő.
A billentyűzettel
- Válassza ki az elemet billentyűzet módban (bal egérgomb).
- Használja a nyilakat az elem vízszintes való mozgatásához, és a PgUp/PgDn a függőleges mozgatáshoz. Tartsa lenyomva az ALT gombot a mozgási sebesség csökkentéséhez, vagy a SHIFT-et a növeléséhez.
Alapértelmezetten az elemek relatívan mozognak a kamerához, és nincsenek tengelyükhöz rögzítve. Ezt le tudja tiltani az Options menüben.
Forgatás
Az egérrel
A kiválasztott elemeket a Z tengely körül elforgathatja az egérgörgővel.
- Válassza ki az elemet billentyűzet módban (bal egérgomb) majd görgesse az egeret, míg a Left CTRL-t lenyomva tartja.
vagy:
- Válassza ki az elemet egér módban (jobb egér), tartsa lenyomva a CTRL-t, és görgessen az egérrel.
A billentyűzettel
- Válassza ki az elemet billentyűzet módban (bal egérgomb).
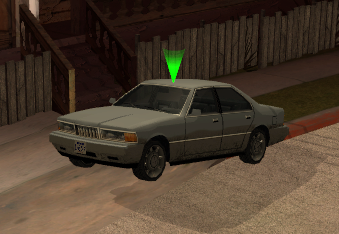
- Amíg lenoymva tartja a CTRL-t (a kijelölési marker zöldre vált), használja az arrow keys és a PgUp/PgDn, hogy az elemet eltérő tengelyek körül forgassa.
Ezen felül mind a két módszernél lenyomva tarthatja az ALT billentyűt a forgási sebesség csökkentéséhez, vagy a SHIFT-et a növeléséhez.
Changing model and other properties
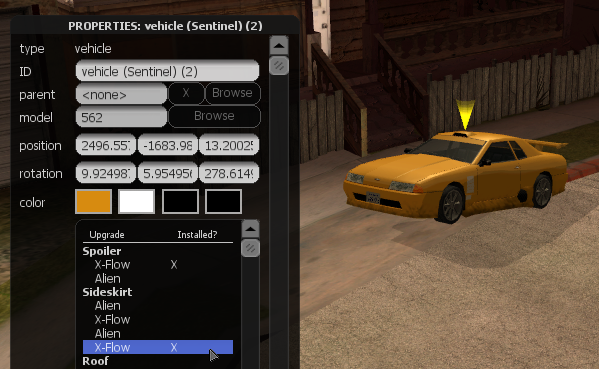
Most elements have a variety of options that can be altered to change their appearance and behaviour. Examples are the model, color and visual upgrades of a car.
- Open the properties window of an element by either double clicking it or by selecting it and pressing F3.
- Make any alterations that you want. For example, to change the model of a car or object, click the Browse button next to "model" to open the model browser.
- Click OK when you're done.
Cloning
You can clone an element by selecting it and pressing C.
- In mouse mode the cloned element will be attached to your cursor. Left click to place it in the map.
- In keyboard mode the cloned element will be cloned in the identical position.
If you hold CTRL while clicking, the element will be cloned again and will again be attached to the cursor. This way you can easily place large quantities of something.
Alternatively you can use the Pullout button located in the bottom-right corner of the properties box to clone an element.
Deleting
Simply select the element and press DEL (Delete).
Alternatively you can use the Pullout button located in the bottom-right corner of the properties box to delete an element.
Creating maps for specific gamemodes
To make a map for a specific gamemode, you have to do two things:
- Click the Map Settings button in the top menu, go to the Gamemodes tab and add any gamemodes that your map is to be used with.
- You will likely also need to add one or more Editor Definition Files. These will allow you to place gamemode specific elements in the map, like spawnpoints, race checkpoints, or CTF flags. You can add EDF's by clicking the Definitions menu button and adding the relevant gamemodes.
Controls
Here is a list of all default controls. To change them please go to the MTA Settings menu while the Editor is started.
Camera
| camera_move_forwards | w |
| camera_move_backwards | s |
| camera_move_left | a |
| camera_move_right | d |
| high_sensitivity_mode | e |
Cloning
| clone_selected_element | c | |
| clone_drop_modifier | lctrl | (Left CTRL) |
Element manipulation
| element_move_forward | arrow_u | (Arrow key Up) |
| element_move_backward | arrow_d | (Arrow key Down) |
| element_move_left | arrow_l | (Arrow key Left) |
| element_move_right | arrow_r | (Arrow key Right) |
| element_move_downwards | pgdn | (Page Down) |
| element_move_upwards | pgup | (Page Up) |
| zoom_in | mouse_wheel_down | |
| zoom_out | mouse_wheel_up | |
| quick_rotate_increase | mod_rotate + mouse_wheel_up | (Left CTRL + Mouse wheel Up) |
| quick_rotate_decrease | mod_rotate + mouse_wheel_down | (Left CTRL + Mouse wheel Down) |
| mod_rotate | lctrl | (Left CTRL) |
| mod_slow_speed | lalt | (Left ALT) |
| mod_fast_speed | lshift | (Left SHIFT) |
| destroy_selected_element | delete | |
| drop_selected_element | space | |
| pickup_selected_element | F2 | |
| reset_rotation | mod_rotate + r | (Left CTRL + R) |
GUI
| toggle_gui_display | F4 | |
| toggle_cursor | f | |
| select_target_keyboard | mouse1 | (Left Mouse button) |
| select_target_mouse | mouse2 | (Right Mouse button) |
| edf_next | mouse_wheel_up | |
| edf_prev | mouse_wheel_down | |
| undo | Ctrl + z | |
| redo | Ctrl + y | |
| properties_toggle | F3 | |
| browser_up | arrow_u | (Arrow key Up) |
| browser_down | arrow_d | (Arrow key Down) |
| browser_zoom_in | mouse_wheel_up | |
| browser_zoom_out | mouse_wheel_down | |
| browser_confirm | enter | |
| currentelements_up | num_8 | (Numpad key 8) |
| currentelements_down | num_2 | (Numpad key 2) |
| toggle_test | F5 |
Multiplayer
The editor is built with both serverside and clientside components, and therefore supports multiplayer out of the box. To use the editor in multiplayer with other players, simply copy all of the editor's resources into your server, start the editor resource and allow other players to join.
Please note that currently the editor lacks any permissions system, so all users have access to every function.
Plugins & External resources
The editor allows basic importing of elements from external resources. This is useful for resources that may have to manipulate an element in a specific way that cannot be performed by the editor. For example, a map resource which uses custom models (and has a script to import these models) cannot be manipulated by default within the editor.
By using the import <resourceName> command in console the resource's elements can be imported within the editor.
FAQ
I get a black screen when launching the Map Editor
Usually this is caused due to incorrect installation of Map Editor resources. If you are using a stable MTASA client, please install it again and make sure that you use Client and Server install option.
If you are using a nightly build, to get it working right you need to download latest resources (step 3), unpack the archive and put its contents in: MTA San Andreas\server\mods\deathmatch\resources , where MTA San Andreas is a folder where you've installed MTA San Andreas (default location: C:\Program Files\MTA San Andreas).
Putting them in this path: MTA San Andreas\mods\deathmatch\resources is a common mistake - it won't work if you put them there. So make sure to put them in the italic path above.
If this issue still occurs, even when you've checked the note above and verified that you've installed it correctly, it might be because you've got an outdated acl.xml file. You can download the default one here. It should be placed in server/mods/deathmatch/ in your MTA: San Andreas installation directory.
I get an "Could not start the local server. See console for details" when using the "Map Editor" button
This is because you do not have a valid editor.conf installed. You can download the default one here. It should be placed in server/mods/deathmatch/ in your MTA: San Andreas installation directory.
I have saved a map but cannot find it in my server's resources directory, despite the Editor itself being able to see it
This is due to the fact that Vista/7 limits write-access for non-admin processes in Program Files directory. Files get written in the "VirtualStore" directory instead of real Program Files folder. You should be able to locate your map resource in a similar directory to:
C:\Users\<USERNAME>\AppData\Local\VirtualStore\Program Files\MTA San Andreas\server\mods\deathmatch\resources\
Running the Server/MTA San Andreas with Administrative rights will allow the map to be saved to the proper location.
I have some other problem with the map editor
Sometimes resetting the map editor will solve certain issues. The easiest way to do that is install MTA:SA to a brand new folder. Otherwise you can try the following steps:
- 1. Go to the resources folder, server/mods/deathmatch/resources/ and delete the editor_dump directory
- 2. Go to the resources folder, server/mods/deathmatch/resources/ and delete the editor_test directory
I have found a bug or have a suggestion/feedback for the map editor
Please use the official bugtracker for reporting bugs. Feel free to also join us on IRC.
