PIMP: Difference between revisions
mNo edit summary |
|||
| (7 intermediate revisions by one other user not shown) | |||
| Line 8: | Line 8: | ||
'''Promotional video:''' | '''Promotional video:''' | ||
[[Image:Promovideo.png]] | [[Image:Promovideo.png|link=http://www.youtube.com/watch?v=TWrgSiKcX1k]] | ||
Enjoy! | '''TUTORIAL video:''' | ||
[[Image:Tutvideo.png|link=http://www.youtube.com/watch?v=gYLvEFG_WeY]] | |||
'''Enjoy!''' | |||
==Installation== | ==Installation== | ||
| Line 192: | Line 197: | ||
---- | ---- | ||
====[[Image:Setvehiclemodel | ====[[Image:Setvehiclemodel.png]] Set vehicle model==== | ||
Change the vehicle's model. | Change the vehicle's model. | ||
| Line 314: | Line 319: | ||
'''All properties''': Restore handling (true) or don't restore (false). | '''All properties''': Restore handling (true) or don't restore (false). | ||
[[Category:Tutorials]] | |||
Latest revision as of 01:54, 7 April 2018
What is it?
PIMP is an EDF-based plug-in for the map-editor, with which you can easily add actions to markers. Teleports, handling, text on your screen, boosts, gravity, creating filmic scenes and much more: it's all there and very easy to use! This tutorial explains how to use the tool, what the options are for and more.
Promotional video:
TUTORIAL video:
Enjoy!
Installation
Once you have downloaded the file, put it in the resources directory of your MTA-installation:
MTA San Andreas / server / mods / deathmatch / resources
NOTE: The server where your map will be played must also have the resource in the 'resources' directory and the resource must be running on the background (just start it when the server starts and that's all you have to do).
Starting it up in the map-editor
Once you are in the map editor:
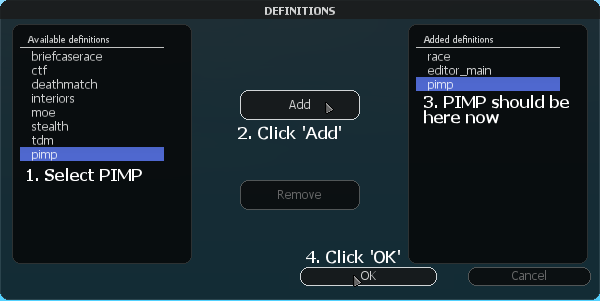
- Click on the Definitions icon.
- Click on pimp and click the Add button
- Position your mouse on the buttons on the bottom-left corner
- Scroll your mousewheel until you reach the PIMP-buttons
- You are now ready to use it! Don't forget to save!
How to use the tool
PIMP works with markers. For example, you add a teleport-element to a marker and when you hit that marker, you are teleported.
Creating a PIMP-element and adding it to a marker
- Position your mouse on the bottom-left icons and scroll until you reach the default elements:
- Click the "marker"-button to create a marker:
- Place it somewhere, select it and press the "F3"-key on your keyboard.
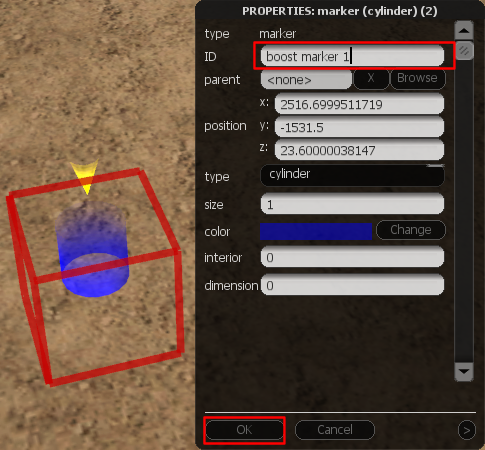
- Fill in a decent name in the "ID"-box. If you're going to add a boost to it for example, name it "pimp boost 1". Then click on the "OK"-button.
- Click on one of the PIMP-elementbuttons on the bottomleft corner of your screen:
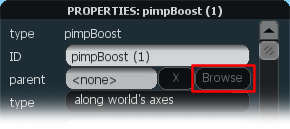
- Click on the "Browse"-button next to "parent":
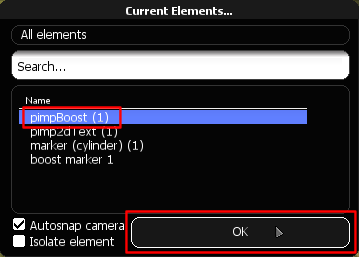
- Choose the marker you just created and click on the "OK"-button:
Fill in the other options. What the options do, is written on this page (scroll down). Hit the "OK"-button at the bottom of the window again to save.
You're done!
IMPORTANT: Sometimes the "parent" isn't saved properly when you click on "OK"!
This is a bug in the editor and it appears mostly at the "Teleport"- and "Camera Position"-elements!
You can check this by opening the elements-list:
![]()
Doubleclick on your PIMP-element in the list (properties window of that element should appear) and if it says <none> in the "parent"-box, set a new parent by clicking the "Browse button", as described above.
Testing
When in editor testmode, just type /restart pimp to test the PIMP-stuff in your map. Every time you enter the testmode, you must use /restart pimp to let the PIMP-resource analyze the map.
PIMP-elements and their options
 2D Text
Create a text on the screen when you hit the marker. NOTE: Time is in milliseconds! (1 second = 1000 milliseconds) If you want it to move for 5 seconds, fill in 5000.
- ID: The name of the element. If you name it properly, it's easier to find it back when you set it as parent later on.
- text: Text to be displayed. Use #N to start a new line and use normal colorcodes (#ffaa00 etc.) to change the color. For example: This is the first line#NThis is the second line and #ff0000this text is now red
- time: Time for the text to be displayed (milliseconds).
- fadeTime: Time the fade-in and fade-out take (milliseconds).
- size: Size of the text. Default is 2, 1 is normal small text like in the chatbox.
- font: Font the text is written in.
- color: Color of the text. However, this can be overridden if you use colorcodes (#ffaa00 etc).
- shadow: Shadow on (true) or off (false).
- alignX: Horizontally align the text left, center or right.
- alignY: Vertically align the text at the top, center or bottom.
- screenX: Horizontal position of the text on the screen, between 0 and 1. For example, 0 means left, 0.5 is the middle.
- screenY: Vertical position of the text on the screen, between 0 and 1. For example, 0 means top and 0.5 is the middle.
- hideMarkers: Make the marker invisble (true) or don't (false).
 3D Text
Create a text that seems to be in the world at the position of the marker.
- ID: The name of the element. If you name it properly, it's easier to find it back when you set it as parent later on.
- text: Text to be displayed. Use #N to start a new line and use normal colorcodes (#ffaa00 etc.) to change the color. For example: This is the first line#NThis is the second line and #ff0000this text is now red
- maxDistance: Maximum distance for the text to be visible.
- scaling: Scaling of the text, when further away, on (true) or off (false).
- fading: Fading of the text, when further away, on (true) or off (false).
- size: Size of the text. Default is 2, 1 is normal small text like in the chatbox.
- font: Font the text is written in.
- color: Color of the text. However, this can be overridden if you use colorcodes (#ffaa00 etc).
- shadow: Shadow on (true) or off (false).
- alignX: Horizontally align the text left, center or right.
- alignY: Vertically align the text at the top, center or bottom.
- hideMarkers: Make the marker invisble (true) or don't (false).
 Teleport
Teleport the player/vehicle.
NOTE: Time is in milliseconds! (1 second = 1000 milliseconds) If you want it to move for 5 seconds, fill in 5000.
- ID: The name of the element. If you name it properly, it's easier to find it back when you set it as parent later on.
- teleportTo: Click on "Browse" and select the vehicle you created. You will be teleported to the position and rotation of this vehicle.
- velocity: After teleportation, change the velocity (fill in velocityX, velocityY, velocityZ) or keep old velocity.
- velocityX, velocityY, velocityZ: New X-, Y- and Z-velocity after teleportation.
- turnVelocity: After teleportation, change the turnVelocity (fill in turnVelX, turnVelY, turnVelZ) or keep old turnvelocity.
- turnVelX, turnVelY, turnVelZ: New X-, Y- and Z-turnvelocity after teleportation.
- changeModel: Change model to model of the vehicle you set as teleportTo (true) or don't change model (false).
- freezeTime: Time the vehicle should remain frozen after teleportation (milliseconds).
- fadeScreen: Set true to fade-out to a black screen and fade-in again after teleportation.
- fadeTime: Time the fade-in and fade-out take (milliseconds).
- hideMarkers: Make the marker invisble (true) or don't (false).
 Boost
Boost
Give the player/vehicle a boost.
- ID: The name of the element. If you name it properly, it's easier to find it back when you set it as parent later on.
- type: Boost vehicle along world axes (Y = north, Z = east, Z = up) or along the vehicle's axes (Y = forwards/backwards, X = sidewards, Z = up/down).
- velocityX, velocityY, velocityZ: New X-, Y- and Z-velocity after teleportation.
- turnVelocity: Keep old turnvelocity or change the turnVelocity (fill in turnVelX, turnVelY, turnVelZ).
- turnVelX, turnVelY, turnVelZ: New X-, Y- and Z-turnvelocity.
- hideMarkers: Make the marker invisble (true) or don't (false).
 Set vehicle gravity
Set gravity on the vehicle. Default is X=0, Y=0 and Z=-1. For example, upside-down is X=0, Y=0 and Z=1.
- ID: The name of the element. If you name it properly, it's easier to find it back when you set it as parent later on.
- gravityX, gravityY, gravityZ: X-, Y- and Z-gravity on the vehicle.
- hideMarkers: Make the marker invisble (true) or don't (false).
 Blip
Blip
Create a blip on the position of the marker or attach a blip to the player/vehicle when the marker is hit.
- ID: The name of the element. If you name it properly, it's easier to find it back when you set it as parent later on.
- type: Attach to the player when hit, or attach to the marker (permanently).
- iconID: IconID. Click for a list of ID's: Radar Blips
- size: Size of the blip, only works if iconID = 0.
- color: Color of th eblip, only works if iconID = 0.
- distance: Maximum distance the blip is visible from.
- hideMarkers: Make the marker invisble (true) or don't (false).
 Camera Position
Position the player's camera somewhere else and make it follow the player, or look at a certain position.
IMPORTANT
Camera Position uses multiple. One to trigger (parent), one for the position of the camera and, if camera is not pointed at the player, a third marker to look at. However, you can use the same marker for multiple purposes. For example, you can use the parent-marker also as posElement-marker.
- ID: The name of the element. If you name it properly, it's easier to find it back when you set it as parent later on.
- posElement: Marker where the camera is positioned.
- lookAt: Follow the player, or look at a marker --> set marker at lookAtMarker.
- lookAtMarker: Marker to look at, if lookAt = "marker".
- rollAngle: Rotation of the camera.
- fov: How much the camera is zoomed in, default = 70.
- time: Time the camera should keep on doing this, before it is restored to watching the player as usual. Time = 0 means forever, until you drive through a cameraTargetPlayer-element or map stops.
- fadeScreen: Set true to enabled fading screen before camera changed, false to not fade.
- fadeTime: Time the fade-in and fade-out take (milliseconds).
- doFor: Change camera for the player that hits the marker only, or for everyone.
- hideMarkers: Make the marker invisble (true) or don't (false).
 Camera Target Player
This restores the camera to following the player, as usual.
- ID: The name of the element. If you name it properly, it's easier to find it back when you set it as parent later on.
- wait: Time to wait before restoring the camera (milliseconds).
- doFor: Restore camera for the player that hits the marker only, or for everyone.
- hideMarkers: Make the marker invisble (true) or don't (false).
 Set vehicle rotation
Rotate the vehicle.
- ID: The name of the element. If you name it properly, it's easier to find it back when you set it as parent later on.
- type: Add rotation set below to current rotation or set it as a whole new rotation.
- rotX, rotY, rot: X-, Y- and Z-rotation on the vehicle.
- hideMarkers: Make the marker invisble (true) or don't (false).
 Set vehicle model
Change the vehicle's model.
- ID: The name of the element. If you name it properly, it's easier to find it back when you set it as parent later on.
- modelID: The modelID of the vehiclemodel to change into.
- offsetZ: Offset on Z-axis (for example, Dumper will get stuck in the ground if you change into it from a Kart).
- doFor: Change only the player's vehicle, change all other player's vehicles or change everyone's vehicle.
- hideMarkers: Make the marker invisble (true) or don't (false).
 Enable cheat
Enable a cheat.
NOTE: Time is in milliseconds! (1 second = 1000 milliseconds) If you want it to move for 5 seconds, fill in 5000.
- ID: The name of the element. If you name it properly, it's easier to find it back when you set it as parent later on.
- type:
- aircars: Flying cars.
- hovercars: Cars can drive on water.
- extrabunny: Extremely high bunny hop on a bicycle.
- enabled: Turn cheat on (true) or off (false).
- time: Time to turn cheat off, if enabled = true (milliseconds).
- doFor: Enable/disable cheat for the player that hits the marker only or for everyone.
- hideMarkers: Make the marker invisble (true) or don't (false).
 Blow vehicle
Blow up the player's or everyone's vehicle.
- ID: The name of the element. If you name it properly, it's easier to find it back when you set it as parent later on.
- explode: Blow up the car with explosion (true) or without explosion (false).
- doFor: Blow up the player's car, everyone's exept the player's car or everyone's.
- hideMarkers: Make the marker invisble (true) or don't (false).
 Fix vehicle
Fix vehicle or set health level.
- ID: The name of the element. If you name it properly, it's easier to find it back when you set it as parent later on.
- health: Health (0% - 100%).
- doFor: Fix only the player's car or everyone's.
- hideMarkers: Make the marker invisble (true) or don't (false).
 Set vehicle damageproof
Makes the vehicle damageproof.
- ID: The name of the element. If you name it properly, it's easier to find it back when you set it as parent later on.
- enabled: Make the vehicle damageproof (true) or not (false).
- hideMarkers: Make the marker invisble (true) or don't (false).
 Set gamespeed
Set gamespeed.
- ID: The name of the element. If you name it properly, it's easier to find it back when you set it as parent later on.
- speed: Gamespeed (0 - 10).
- doFor: Set gamespeed for the player only or for everyone.
- hideMarkers: Make the marker invisble (true) or don't (false).
 Set worldgravity
Set gravity of the world.
- ID: The name of the element. If you name it properly, it's easier to find it back when you set it as parent later on.
- gravity: Gravity, default = 0.008.
- doFor: Set Gravity for the player only or for everyone.
- hideMarkers: Make the marker invisble (true) or don't (false).
 Set vehicle handling
Change the handling of a vehicle.
- ID: The name of the element. If you name it properly, it's easier to find it back when you set it as parent later on.
- doFor: Change handling of the player's vehicle, everyone's exept the player's vehicle or everyone's vehicle.
- hideMarkers: Make the marker invisble (true) or don't (false).
- mass: mass: The vehicle's mass in kilograms. (1.0 - 100000.0)
- turnMass: turnMass: The vehicle's turnmass in kilograms. (0.0 - 1000000.0)
- dragCoeff: dragCoeff: The higher, the less resistance and more movement. (-200.0 - 200.0)
- COMX: centerOfMassX: X-center of mass. (-10.0 - 10.0)
- COMY: centerOfMassY: Y-center of mass. (-10.0 - 10.0)
- COMZ: centerOfMassZ: Z-center of mass. (-10.0 - 10.0)
- percSubmerged: percentSubmerged: Percentage of vehicle height required to be submerged for the car to float. (1 - 99999)
- tracMultiplier: tractionMultiplier: Cornering grip of the vehicle as a multiplier of tyre surface friction. (-100000.0 - 100000.0)
- tracLoss: tractionLoss: Accelerating/braking grip. (0.0 - 100.0)
- tracBias: tractionBias: Front- to rear-axle grip: higher value --> grip shifts forwards (0.5 is center). (0.0 - 1.0)
- gears: numberOfGears: Number of gears. (1 - 5)
- maxVelocity: maxVelocity: Top speed. For example, Infernus top speed is 240. (0.1 - 200000.0)
- acceleration: engineAcceleration: Acceleration-rate. For example, Infernus acceleration is 30. (0.0 - 100000.0)
- engInertia: engineInertia: Smoothens/sharpens acceleration curve. (-1000.0 - 1000.0)
- driveType: driveType: Frontwheeldrive, rearwheeldrive or fourwheeldrive.
- engineType: engineType: Petrol, diesel or electric.
- brakeDeceleration: brakeDeceleration: Decelleration when braking. For example, Infernus has 11. (0.1 - 100000.0)
- brakeBias: brakeBias: Break force position between front- and rear-axle: higher value --> grip shifts forwards (0.5 is center). (0.0 - 1.0)
- steeringLock: steeringLock: Maximum steeringangle in degrees. (0.0 - 360.0)
- susForLevel: suspensionForceLevel: Suspension force. (0.0 - 100.0)
- susDamping: suspensionDamping: Suspension damping. (0.0 - 100.0)
- susHiSpeDamping: suspensionHighSpeedDamping: Stiffens damping when speed increases. (0.0 - 600.0)
- susUpLimit: suspensionUpperLimit: Uppermost movement of wheels in metres. (-50.0 - 50.0)
- susLoLimit: suspensionLowerLimit: Ride height of vehicle in metres. (-50.0 - 50.0)
- susFrReBias: suspensionFrontRearBias: Ratio of suspension to apply at front compared to rear (higher = more on front, 0.5 is center). (0.0 - 1.0)
- susAnDiMultiplier: suspensionAntiDiveMultiplier: Changes the amount of bodypitch when accelerating/braking. (0.0 - 30.0)
- colDamMultiplier: collisionDamageMultiplier: Amount of damage at collision. For example, Infernus has 0.72. 0 is damageproof. (0.0 - 10.0)
 Reset vehicle handling
Restores handling on a vehicle.
- ID: The name of the element. If you name it properly, it's easier to find it back when you set it as parent later on.
- doFor: Restore handling of the player's vehicle, everyone's exept the player's vehicle or everyone's vehicle.
- hideMarkers: Make the marker invisble (true) or don't (false).
All properties: Restore handling (true) or don't restore (false).

