Compiling MTASA
In order to successfully build Multi Theft Auto from source, it is necessary to perform a number of steps, which we will explain below.
Please read the instructions carefully and do not skip parts of it, if you have no experience.
Prerequisites
You should be using Windows 7 or above, before you can compile the Multi Theft Auto client.
Make sure you have the following software and SDKs installed:
Visual Studio 2015
Download
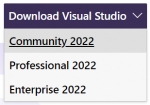
Microsoft Visual Studio 2015 (Community Edition is free).
Addon: EditorConfig (optional)
Download: EditorConfig
(Install this addon to automatically set up your IDE for the correct code formatting)
Missing #include "afxres.h"
Make sure you have Microsoft Foundation Classes for C++ installed.
(You can re-run the installer to modify your current installation, no need to uninstall and reinstall)
Microsoft DirectX SDK
Download
Microsoft DirectX SDK
S1023 Error
"S1023" error when you install the DirectX SDK (June 2010)
Git Client
You have 2 options here available. You can install ONE of the clients below (for collaboration) or download the entire codebase in a .ZIP file (if you only want to compile the code). You can also use Git on the command line to checkout the respository.
GitHub Desktop
Download:
GitHub for Windows
SourceTree
Download:
SourceTree
Getting the latest source code
To get the latest code, you will have to download the latest copy of our Git repository.
We recommend cloning the repository in your Git client, because you can pull any updates from there easily.
- Repository: multitheftauto/mtasa-blue
- .zip: master.zip
- .tar.gz: master.tar.gz
Getting the latest network module
You should install the latest unstable nightly Windows full installer into this exact directory:
C:\Program Files\MTA San Andreas 1.6\
If you have 64 bit windows, be sure to remove (x86) from the path.
Since the netc.dll/net.dll network modules for the software are covered by a different license, you will have to use the binary files that get installed with the latest nightly.
If you want to run a debug version of MTA, the client expects a debug version of the net.dll. As we don't provide this, you can append '_d' to a copy of the network dll.
Furthermore, it is advisable to create an empty "timeout.longtime" file in your Bin/server/ directory, but you have to compile the code first.
This will extend the time before players are kicked from your server for unresponsiveness to 120 seconds. This is useful when in Debug mode on the client and the process is halted.
Compiling the code
- Execute the script create-projects.bat
- Open the solution file MTASA.sln in the Build directory
- Compile in Visual Studio with Debug (may take some minutes)
- Install data files: utils\premake5.exe install_data (Shift + Right-Click in the <root> directory and click on Open command window here)
- Install resources: utils\premake5.exe install_resources (optional step)
- Copy server/net.dll to Bin/server and MTA/netc.dll to Bin/mta directory respectively from C:\Program Files\MTA San Andreas 1.6\
- Clone and rename both Bin/server/net.dll and Bin/mta/netc.dll' with the suffix '_d' (e.g. Bin/server/net_d.dll)
Running the software
Running the client
You can start your client in the Bin directory. You might find there a Multi Theft Auto.exe and/or Multi Theft Auto_d.exe executable. The _d suffix indicates a debug build of the software.
Furthermore, you can also run your client inside the debugger from Visual Studio if you want to investigate a stack trace or set breakpoints in interesting code regions (read more in the section below).
Running the dedicated server
If you already have run the step 5 (Install resources) in Compiling the code to install resources then you can goto Starting the server.
Installing the latest resources
If you want to run the Multi Theft Auto dedicated server, you will have to install the required resources. These are required because they implement the most basic functionality (e.g. spawning players) in order to play.
Our official resources repository is hosted on GitHub. You can download the latest resources from there or download a zipped version. Make sure that you have the latest resources package.
Starting the server
To run the server, open the MTA Server.exe executable in the Bin/server directory. The _d suffix indicates a debug build of the software.
You can also run the debug build MTA Server_d.exe in the Visual Studio Debugger.
If you have any problems with missing DLL files (e.g. libcurl.dll), then you can copy these from your MTA installation.
Debugging
If you already compiled the code in the Debug configuration then continue reading, if not, then go up to Compilling the code and follow the steps for a Debug build.
You can either launch MTA yourself and attach any debugger you want to use (also applies to the Visual Studio debugger) or you start a local debugging session in Visual Studio.
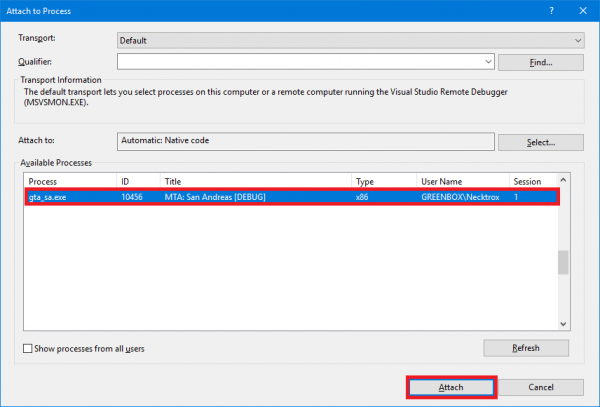
If you choose to run MTA with Visual Studio then you should also attach the debugger to the executable gta_sa.exe (press CTRL + ALT + P in Visual Studio) - otherwise your
breakpoints will not work for anything beside the MTA Launcher project.
Troubleshooting
Microsoft DirectX SDK (August 2009) includes missing
You can either use the DirectX SDK (August 2009) package or modify the source code to omit this warning to compile the code anyway (might break shaders etc.):
Open the file mtasa-blue\Client\core\DXHook\CDirect3DHook9.cpp in an editor of your choice and go to the line
#if D3DX_SDK_VERSION != 42
and change it to
#if D3DX_SDK_VERSION != 43
(for June 2010 SDK).
Missing mtaserver.conf
If you are missing the default configuration files for your server then go ahead and install these from here and extract all three files to Bin/server/mods/deathmatch.
Getting involved
Please see our Coding guidelines for information on coding practice.
Additional information
If you need more information, try our bug tracker or IRC channel.


